Tutorial originally created for an SBJS event
Corresponding slides are here
Video from the SBJS event here
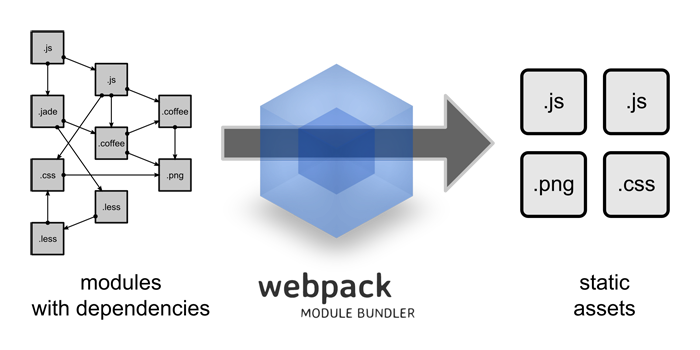
What is Webpack? Is it really automagical? Can it replace my build system? What the heck is a module bundler anyway?
Webpack is arguably the most popular module bundling solution out there today. It's undeniably powerful, and does a lot right out of the box, but its configuration can be daunting and the available examples are often complex and unapproachable.
This tutorial builds on the slide deck linked above and walks step-by-step from absolute webpack basics through to a simple React application with Hot Module Replacement
- Node.js installed (preferably 5.x + npm 3.x)
- Using the CLI is easier if "node_modules/.bin" is in your path
To see each step in action:
$ git checkout step<step #>
$ npm install
$ mkdir webpack-tutorial && cd $_$ npm init- follow the prompts$ npm install --save-dev webpack- Create an index.html file:
<html>
    <head>
        <meta charset="utf-8">
    </head>
    <body>
        <script type="text/javascript" src="bundle.js" charset="utf-8"></script>
    </body>
</html>
- Create a new file, entry.js:
document.write('<a href="#">home</a> : <a href="#about">about</a>');
$ webpack /.entry bundle.js- Open index.html in a browser
- Create a new file, content.js:
module.exports = '<a href="#">home</a> : <a href="#about">about</a>';
- Update entry.js to require() content.js
document.write(require('./content.js'));
$ webpack /.entry bundle.js- Open index.html in a browser
$ npm install --save-dev style-loader css-loader- Create a new file, style.css:
body {
  background: silver;
}
- Import styles.css from entry.js using inline syntax:
require('style!css!./style.css');
document.write(require('./content.js'));
$ webpack /.entry bundle.js- The "style" and "css" loaders will load your styles into the bundle and inject them into the HTML document as style tags
- Open index.html in a browser
- Adding the loaders in the require statement is verbose, module binding lets us just require() the css file
- Import styles.css from entry.js without inline syntax
require('./style.css');
document.write(require('./content.js'));
$ webpack ./entry bundle.js —module-bind ‘css=style!css'- Open index.html in a browser
- Install the url-loader for inlining images as base64-encoded strings
$ npm install --save-dev url-loader- Add a logo placeholder in content.js:
module.exports = '<a href="#">home</a> : <a href="#about">about</a><div class="logo"></div>';
- Add background image for the logo placeholder to styles.css:
body {
  background: white;
}
.logo {
  background-image: url('./webpack-logo.png');
  width: 497px;
  height: 270px;
  margin: auto;
}
- Download the webpack logo: https://raw.githubusercontent.com/tdoherty/webpack-tutorial/master/webpack-logo.png
- Add webpack.config.js with loaders for .css and .png files:
module.exports = {
  entry: "./entry.js",
  output: {
    path: __dirname,
    filename: "bundle.js"
  },
  module: {
    loaders: [
      { test: /\.css$/, loader: "style!css" },
      { test: /\.png$/, loader: "url" }
    ]
  }
};
- Now we don't need to pass options to the CLI
$ webpack- Open index.html in a browser
- Move the document.write statement from entry.js to content.js, with some additional markup elements:
document.write('<div id="main"><a href="#">home</a> : <a href="#about">about</a><hr /><div class="logo"></div><div id="split-content"></div></div>');
- Remove the document.write statement from entry.js and just require() content.js
require('./style.css');
require('./content.js');
- Add split-content.js
document.querySelector('#split-content').innerHTML = 'I was lazily loaded!';
- Add window hash change event handler (poor man's router) to content.js, which loads split-content.js lazily with require.ensure()
document.write('<div id="main"><a href="#">home</a> : <a href="#about">about</a><hr /><div class="logo"></div><div id="split-content"></div></div>');

window.addEventListener('hashchange', function() {
  var routes = {
    '#about': function () {
      require.ensure(['./split-content'], function (require) {
        var lazyModule = require('./split-content');
      });
    },
    default: function () {}
  };
  var action = routes[window.location.hash] || routes.default;
  action();
}, false);
$ webpack- Open index.html in a browser, click on "about" and you should see "I was lazily loaded!" appear under the webpack logo
$ npm install --save-dev webpack-dev-server$ webpack-dev-server —inline- Open http://localhost:8080 in a browser
- Try changing some code, watch the command line update the bundle and the browser refresh automatically
- Rather than typing
$ webpack-dev-server —inlineevery time we start the dev server let's add an npm start script: - package.json:
{
  "name": "webpack-tutorial",
  ...
  "scripts": {
    "start": "webpack-dev-server --inline"
  },
  ...
}
- Now, to run the dev server, we can just type
$ npm start
- Add HMR support to split-content.js:
if(module.hot) {
  module.hot.accept();
}

document.querySelector('#split-content').innerHTML = 'I was lazily loaded!';
- Update npm start script with "hot" flag:
- package.json:
{
  "name": "webpack-tutorial",
  ...
  "scripts": {
    "start": "webpack-dev-server --inline --hot"
  },
  ...
}
$ npm start- Open http://localhost:8080 in a browser
- Change split-content.js, watch HMR in action, changes should appear without a page reload
- Add UglifyJS plugin to webpack.config.js:
var webpack = require('webpack');

module.exports = {
    entry: "./entry.js",
    output: {
      path: __dirname,
      filename: "bundle.js"
    },
    devtool: '#source-map',
    plugins: [
      new webpack.optimize.UglifyJsPlugin({
        compress: {
         warnings: false
        },
        sourceMap: true
      })
    ],
    module: {
      loaders: [
        { test: /\.css$/, loader: "style!css" },
        { test: /\.png$/, loader: "url" }
      ]
    }
};
$ npm start- Open http://localhost:8080 in a browser
- Open your brower's devtools and confirm uglified bundle(s)
$ npm install --save-dev babel-core babel-loader babel-preset-es2015- Create a new file, lorem-ipsum.js with placeholder text:
export const p1 = 'Lorem ipsum dolor sit amet, pretium sit lectus amet auctor eu, aenean dapibus egestas varius scelerisque praesent magna. Etiam massa tellus molestie mollis sem, aliquet etiam, auctor egestas dui quis ligula lobortis, in maecenas, eu lectus suscipit. Cupiditate dapibus malesuada lorem et, aliquet convallis lorem volutpat. Morbi imperdiet cras molestiae morbi mi, eu inceptos porttitor, massa vitae, arcu vel magnis, libero purus curabitur mi. Sapien sit bibendum fringilla.';
export const p2 = 'Sapien suscipit purus ut pede, donec rutrum quis, in in ut aptent eget bibendum pede. Euismod molestie nam donec tincidunt lectus, mattis quam. Sed tellus. Tincidunt turpis odio diam vehicula lorem aliquam, fringilla et leo, vivamus suspendisse, elit massa auctor consequat massa. Rutrum eu id posuere velit varius, vitae lacus, odio luctus, sollicitudin aptent. Orci suspendisse integer semper, vestibulum laboris malesuada odio wisi urna, tincidunt mauris urna ipsum wisi.';
export const p3 = 'Risus mattis. Ac condimentum. At vestibulum. Vulputate hendrerit lectus. Sed dignissim eget vestibulum placerat, rutrum tellus sit ac eget nulla turpis.';
export const p4 = 'Nunc mauris tellus mauris a. Elementum adipiscing, dictum at metus integer deserunt eu, nulla non tempor et sem pede, nunc odio tellus vel, etiam odio donec condimentum semper. Vel odio metus conubia. Quam hymenaeos libero odio, sit fringilla, hendrerit scelerisque dignissim, enim lacus fusce turpis vel, wisi orci vivamus donec in. Donec congue pulvinar amet suspendisse consectetuer, pellentesque mauris id fermentum lacinia eleifend, id lacus. Nulla cras aliquam neque. Commodo sem tortor etiam sem augue. Massa orci libero justo vitae urna. Vivamus quis, vitae blandit turpis laoreet massa pede, aliquet enim. Viverra ipsum maecenas architecto tempus, euismod laoreet ullamcorper, proin libero integer. Diam dapibus pede, id tempor quis vel suscipit, sit etiam, consequat molestie vivamus placerat viverra viverra cum. Sagittis consequat per eleifend id posuere, laoreet lacus nisl.';
- Create a new file, split-content.css:
.what-is {
  background-image: url('./what-is-webpack.png');
  width: 700px;
  height: 350px;
  margin: auto;
}
- Download the "what is wepback image": https://raw.githubusercontent.com/tdoherty/webpack-tutorial/master/what-is-webpack.png
- Update entry.js with with ES2015 syntax:
import './style.css';
import './content.js';
- Update content.js with ES2015 syntax and additional content:
import {p1, p2, p3, p4} from './lorem-ipsum';

'use strict';

const content = `
  <div class="logo"></div>
  <h1>Webpack: Anatomy of a Module Bundler</h1>
  <div class="ipsum">
    <p>${p1}</p>
    <p>${p2}</p>
    <p>${p3}</p>
    <p>${p4}</p>
  </div>
`;

document.write(`
  <div id="main">
    <a href="#">home</a> : <a href="#about">about</a>
    <hr />
    <div id="content">
      ${content}
    </div>
  </div>
`);

window.addEventListener('hashchange', () => {
  const routes = {
    '#about'() {
      require.ensure(['./split-content'], (require) => {
        require('./split-content').render();
      });
    },
    default: () => {
      document.querySelector('#content').innerHTML = content;
    }
  };
  const action = routes[window.location.hash] || routes.default;
  action();
}, false);
- Update split-content.js with ES2015 syntax and additional content:
import {p1, p2} from './lorem-ipsum';
import './split-content.css';

if(module.hot) {
  module.hot.accept();
}

export const render = () => {
  document.querySelector('#content').innerHTML = `
    <h1>What is Webpack?</h1>
    <div class="what-is"></div>
    <div class="ipsum">
      <p>${p1}</p>
      <p>${p2}</p>
    </div>
  `;
};
- Update style.css with additional content:
body {
  background: white;
}

#main {
  width: 800px;
  margin: auto;
  text-align: center;
  font-family: tahoma;
}

.logo {
  background-image: url('./webpack-logo.png');
  width: 497px;
  height: 270px;
  margin: auto;
}

.ipsum {
  text-align: left;
}
- Update webpack config:
var webpack = require('webpack');

module.exports = {
  entry: './entry.js',
  output: {
    path: __dirname,
    filename: 'bundle.js'
  },
  devtool: '#source-map',
  plugins: [
    new webpack.optimize.UglifyJsPlugin({
      compress: {
       warnings: false
      },
      sourceMap: true
    })
  ],
  module: {
    loaders: [
      { test: /\.css$/, loader: 'style!css' },
      { test: /\.png$/, loader: 'url' },
      {
        test: /\.js$/,
        loader: 'babel',
        exclude: /(node_modules)/,
        query: {
          presets: ['es2015']
        }
      }
    ]
  }
};
$ npm start- Open http://localhost:8080 in a browser
- Open your brower's devtools and confirm ES2015 sourcemaps
$ npm install --save-dev react-hot-loader babel-preset-react- Create a new file, default-content.js, containing a simple React component:
'use strict';

import React, { Component } from 'react';
import './default-content.css';
import {p1, p2, p3, p4} from './lorem-ipsum';

export default class DefaultContent extends Component {
  render() {
    return (
      <div>
        <div className="logo"></div>
        <h1>Webpack: Anatomy of a Module Bundler</h1>
        <div className="ipsum">
          <p>{p1}</p>
          <p>{p2}</p>
          <p>{p3}</p>
          <p>{p4}</p>
        </div>
      </div>
    );
  }
}
- Create a new file, default-content.css, and move the logo style there from style.css:
.logo {
  background-image: url('./webpack-logo.png');
  width: 497px;
  height: 270px;
  margin: auto;
}
- Change split-content.js to a React component:
'use strict';

import React, { Component } from 'react';
import './split-content.css';
import {p1, p2} from './lorem-ipsum';

export default class SplitContent extends Component {
  render() {
    return (
      <div>
        <h1>What is Webpack?</h1>
        <div className="what-is" />
        <div className="ipsum">
          <p>{p1}</p>
          <p>{p2}</p>
        </div>
      </div>
    );
  }
}
- Change content.js to a React component:
'use strict';

import React, { Component } from 'react';
import DefaultContent from './default-content';

export default class Content extends Component {
  constructor() {
    super();
    this.state = {
      view: DefaultContent
    };
  }

  componentDidMount() {
    window.addEventListener('hashchange', (() => {
      const routes = {
        '#about'() {
          require.ensure(['./split-content'], ((require) => {
            const SplitContent = require('./split-content').default;
            this.setState({ view: SplitContent });
          }).bind(this));
        },
        default: this.setState.bind(this, { view: DefaultContent })
      };
      const action = routes[window.location.hash] || routes.default;
      action.call(this);
    }).bind(this), false);
  }

  render() {
    return (
      <div id="main">
        <a href="#">home</a> : <a href="#about">about</a>
        <hr />
        <this.state.view />
      </div>
    );
  }
}
- Update style.css:
body {
  background: white;
}

#main {
  width: 800px;
  margin: auto;
  text-align: center;
  font-family: tahoma;
}

.ipsum {
  text-align: left;
}
- Update entry.js to render the Content React component:
import './style.css';
import React from 'react';
import ReactDOM from 'react-dom';
import Content from './content.js';

document.write(`<div id="root"></div>`);

ReactDOM.render(<Content />, document.getElementById('root'));
- Update the webpack config with the react-hot-loader and react babel presets:
var webpack = require('webpack');

module.exports = {
  entry: [
    'webpack-dev-server/client?http://0.0.0.0:8080', // WebpackDevServer host and port
    'webpack/hot/only-dev-server', // "only" prevents reload on syntax errors
    './entry.js'
  ],
  output: {
    path: __dirname,
    filename: 'bundle.js'
  },
  devtool: '#source-map',
  plugins: [
    new webpack.HotModuleReplacementPlugin()
  ],
  module: {
    loaders: [
      { test: /\.css$/, loader: 'style!css' },
      { test: /\.png$/, loader: 'url' },
      {
        test: /\.js$/,
        loaders: ['react-hot', 'babel?presets[]=es2015,presets[]=react'],
        exclude: /(node_modules)/
      }
    ]
  }
};
- Create a new file, server.js, with a Node API setup of webpack-dev-server:
var webpack = require('webpack');
var WebpackDevServer = require('webpack-dev-server');
var config = require('./webpack.config');

new WebpackDevServer(webpack(config), {
  publicPath: config.output.publicPath,
  hot: true,
  historyApiFallback: true
}).listen(8080, 'localhost', function (err, result) {
  if (err) {
    console.log(err);
  }
  console.log('Listening at localhost:8080');
});
- Lastly, update the npm start script:
{
  "name": "webpack-tutorial",
  ...
  "scripts": {
    "start": "node server.js"
  },
  ...
}
$ npm start- Open http://localhost:8080 in a browser
- Click on the "about" link and you should see the SplitContent component rendered
- Try changing source files, and watch the react-hot-loader in action