A powerful TypeScript library that provides preview functionality, visual editing capabilities, and A/B testing for Prepr CMS integrated with Next.js applications.
# Install the package
npm install @preprio/prepr-nextjs
# or
pnpm add @preprio/prepr-nextjs
Add environment variables to your .env:
PREPR_GRAPHQL_URL=https://graphql.prepr.io/{YOUR_ACCESS_TOKEN}
PREPR_ENV=preview
Set up middleware in middleware.ts:
import type { NextRequest } from 'next/server'
import createPreprMiddleware from '@preprio/prepr-nextjs/middleware'

export function middleware(request: NextRequest) {
  return createPreprMiddleware(request, { preview: true })
}
Add toolbar and tracking to your layout:
import { getToolbarProps, extractAccessToken } from '@preprio/prepr-nextjs/server'
import { PreprToolbar, PreprToolbarProvider, PreprTrackingPixel } from '@preprio/prepr-nextjs/react'
import '@preprio/prepr-nextjs/index.css'

export default async function RootLayout({ children }: { children: React.ReactNode }) {
  const toolbarProps = await getToolbarProps(process.env.PREPR_GRAPHQL_URL!)
  const accessToken = extractAccessToken(process.env.PREPR_GRAPHQL_URL!)

  return (
    <html>
      <head>
        {accessToken && <PreprTrackingPixel accessToken={accessToken!} />}
      </head>
      <body>
        <PreprToolbarProvider props={toolbarProps}>
          <PreprToolbar />
          {children}
        </PreprToolbarProvider>
      </body>
    </html>
  )
}Before installing, ensure you have:
- Next.js 13.0.0 or later (supports App Router)
- React 17.0.0 or later (React 18+ recommended)
- Node.js 16.0.0 or later
- A Prepr account
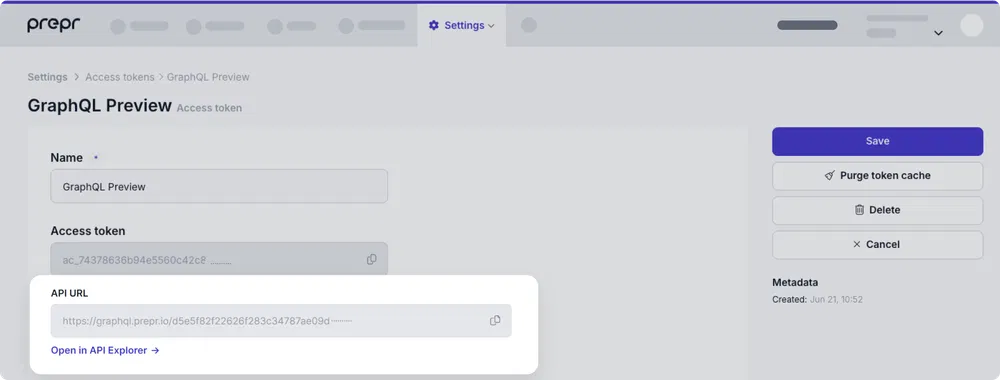
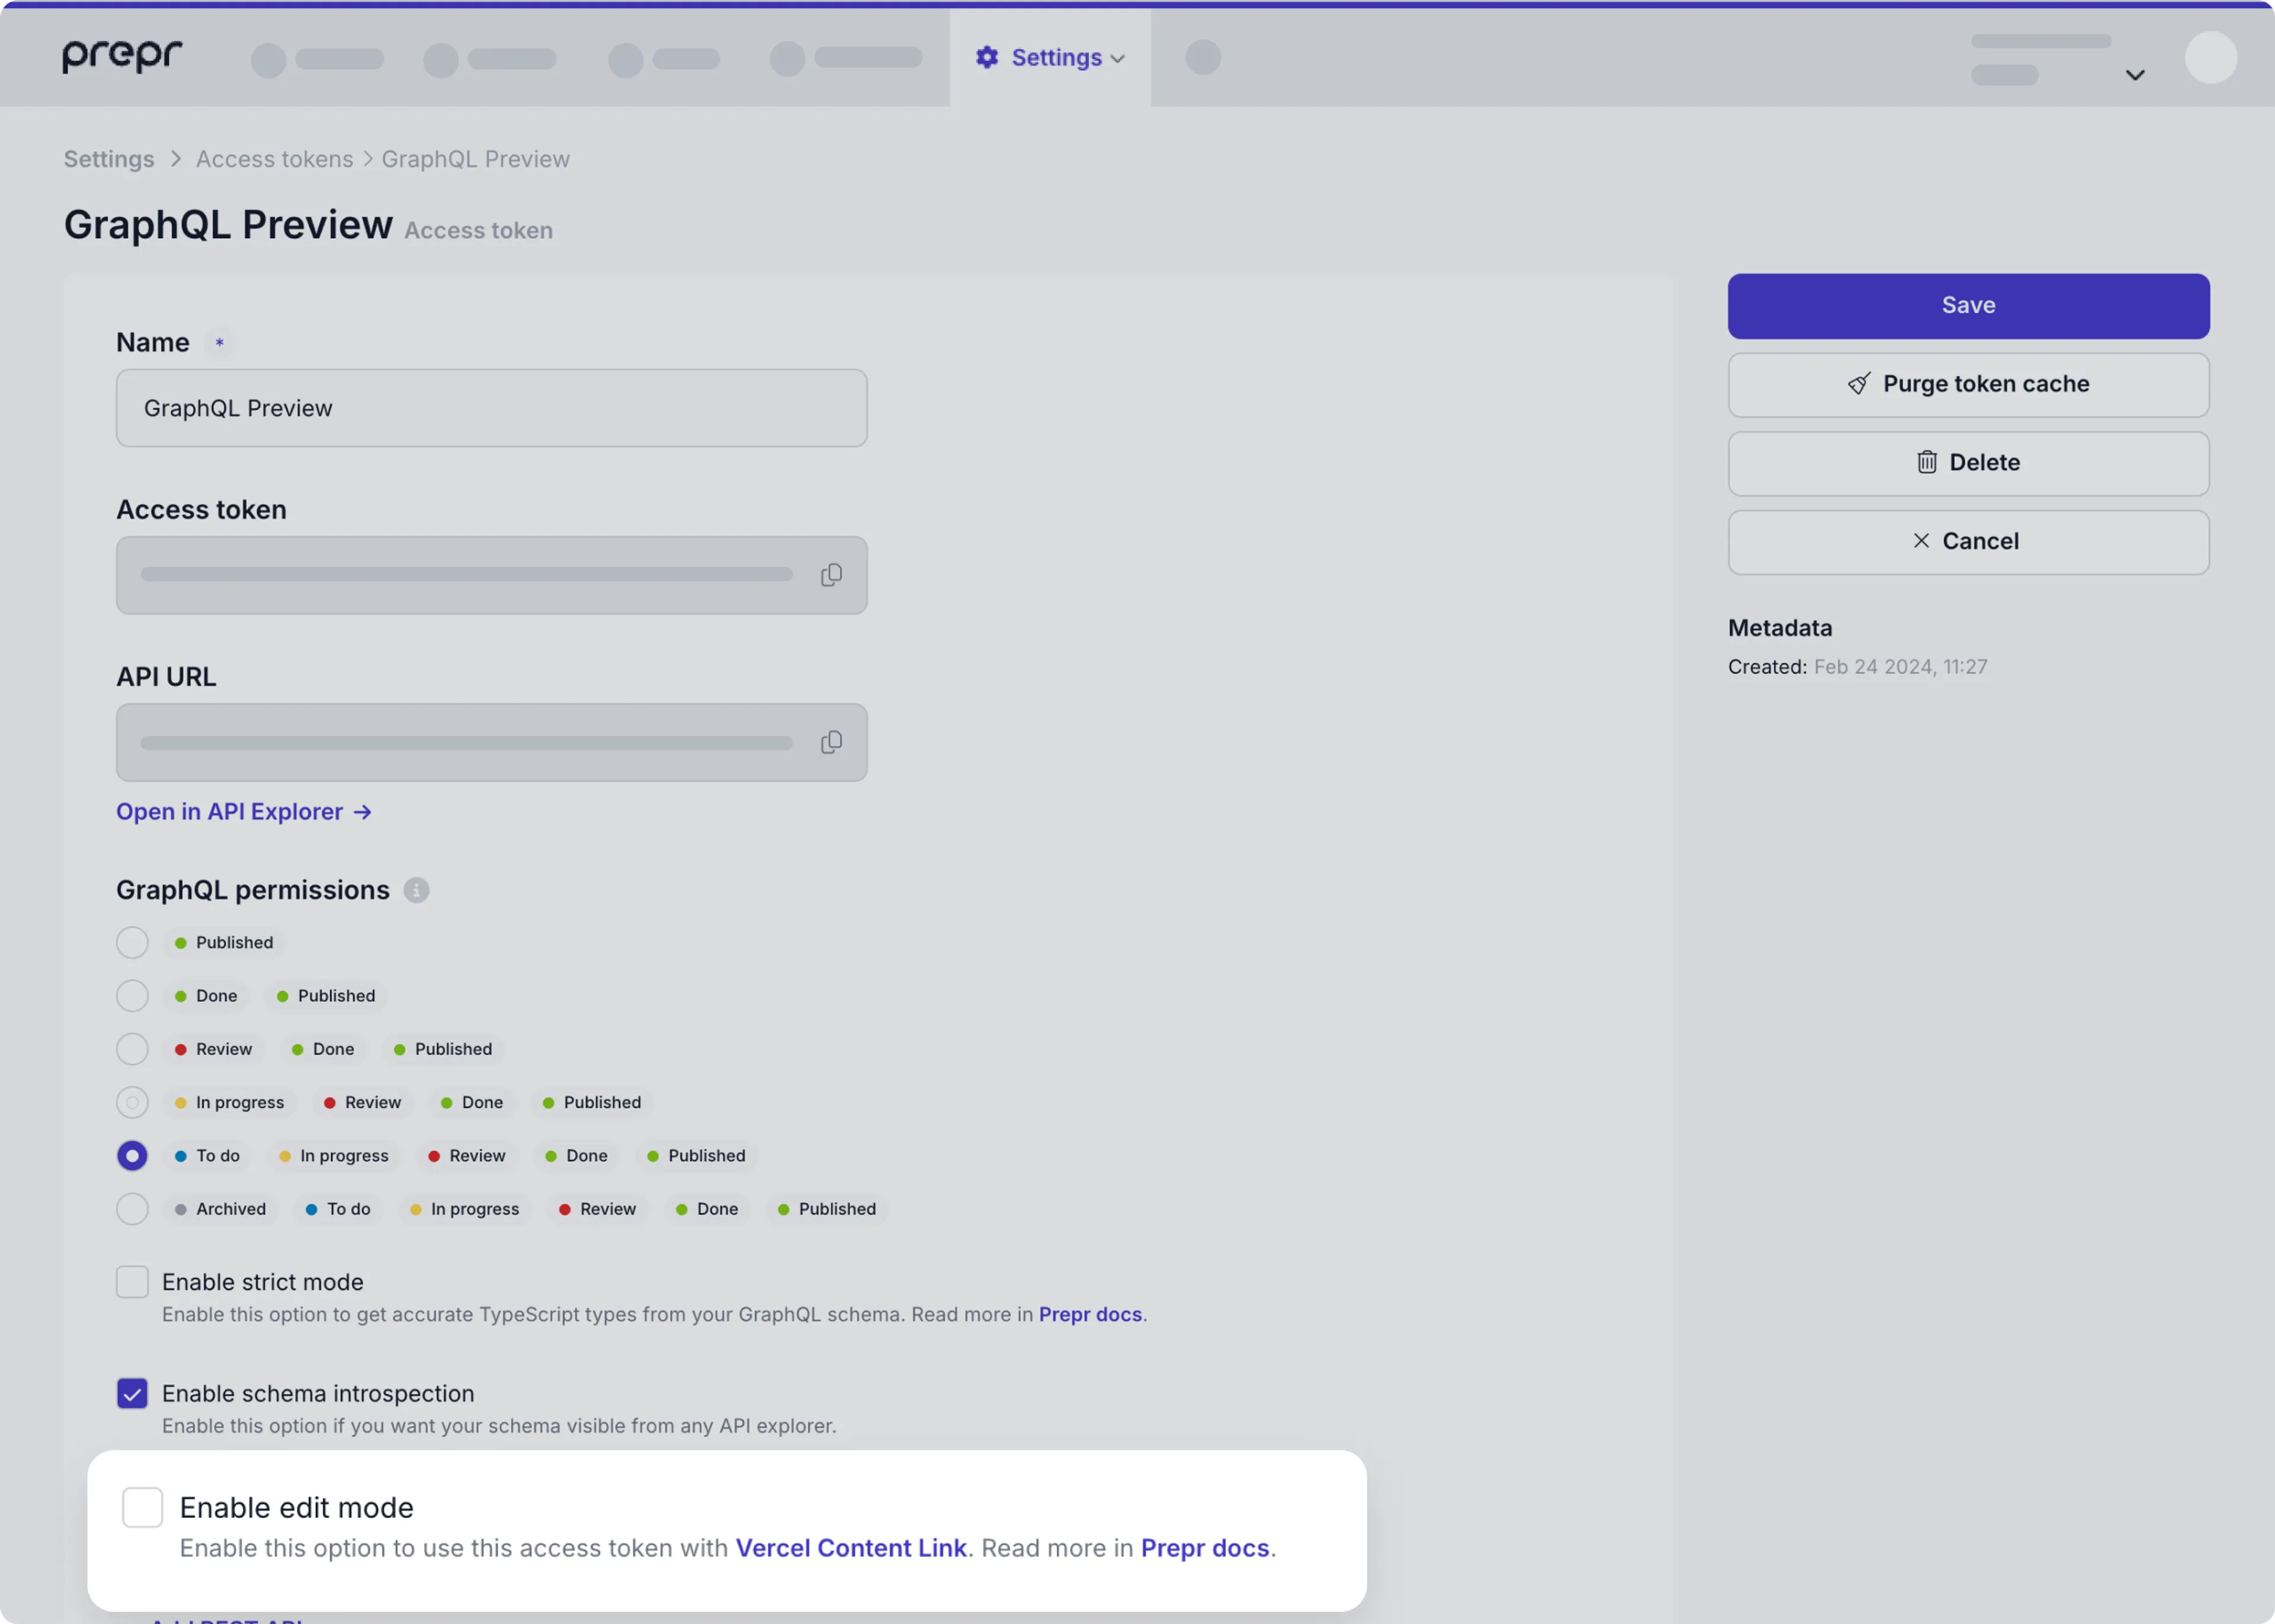
- Prepr GraphQL URL (found in Settings → Access tokens)
- Create a Prepr account at prepr.io
- Get your GraphQL URL:
-
Go to Settings → Access tokens
-
Find your GraphQL Preview access token
-
Copy the full GraphQL URL (e.g.,
https://graphql.prepr.io/e6f7a0521f11e5149ce65b0e9f372ced2dfc923490890e7f225da1db84cxxxxx) -
The URL format is always
https://graphql.prepr.io/{YOUR_ACCESS_TOKEN}
-
- Enable edit mode (for toolbar):
-
Open your GraphQL Preview access token
-
Check "Enable edit mode"
-
Save the token
-
npm install @preprio/prepr-nextjs
# or
pnpm add @preprio/prepr-nextjs
# or
yarn add @preprio/prepr-nextjsCreate or update your .env file:
# Required: Your Prepr GraphQL endpoint
PREPR_GRAPHQL_URL=https://graphql.prepr.io/{YOUR_ACCESS_TOKEN}

# Required: Environment mode
PREPR_ENV=preview    # Use 'preview' for staging/development
# PREPR_ENV=production # Use 'production' for live sites

# Optional: Enable debug logging (development only)
# PREPR_DEBUG=trueImportant: Replace
{YOUR_ACCESS_TOKEN}with your actual Prepr access token from Settings → Access tokens.
The middleware handles personalization headers, customer ID tracking, and preview mode functionality.
Create or update middleware.ts in your project root:
import type { NextRequest } from 'next/server'
import createPreprMiddleware from '@preprio/prepr-nextjs/middleware'

export function middleware(request: NextRequest) {
  return createPreprMiddleware(request, {
    preview: process.env.PREPR_ENV === 'preview'
  })
}

export const config = {
  matcher: [
    /*
     * Match all request paths except for the ones starting with:
     * - api (API routes)
     * - _next/static (static files)
     * - _next/image (image optimization files)
     * - favicon.ico (favicon file)
     */
    '/((?!api|_next/static|_next/image|favicon.ico).*)',
  ],
}Create or update middleware.js in your project root:
import createPreprMiddleware from '@preprio/prepr-nextjs/middleware'

export async function middleware(request) {
  return createPreprMiddleware(request, {
    preview: process.env.PREPR_ENV === 'preview'
  })
}

export const config = {
  matcher: [
    '/((?!api|_next/static|_next/image|favicon.ico).*)',
  ],
}import type { NextRequest, NextResponse } from 'next/server'
import createPreprMiddleware from '@preprio/prepr-nextjs/middleware'
export function middleware(request: NextRequest) {
// Start with your existing middleware
let response = NextResponse.next()
// Add your custom logic
if (request.nextUrl.pathname.startsWith('/admin')) {
response.headers.set('x-admin-route', 'true')
}
// Chain with Prepr middleware
return createPreprMiddleware(request, response, {
preview: process.env.PREPR_ENV === 'preview'
})
}import type { NextRequest } from 'next/server'
import createIntlMiddleware from 'next-intl/middleware'
import createPreprMiddleware from '@preprio/prepr-nextjs/middleware'
const intlMiddleware = createIntlMiddleware({
locales: ['en', 'de', 'fr'],
defaultLocale: 'en'
})
export function middleware(request: NextRequest) {
// First run internationalization middleware
const intlResponse = intlMiddleware(request)
// If next-intl returns a redirect, return it immediately
if (intlResponse.status >= 300 && intlResponse.status < 400) {
return intlResponse
}
// Otherwise, chain with Prepr middleware
return createPreprMiddleware(request, intlResponse, {
preview: process.env.PREPR_ENV === 'preview'
})
}
export const config = {
matcher: [
'/((?!api|_next/static|_next/image|favicon.ico).*)',
],
}import type { NextRequest, NextResponse } from 'next/server'
import createPreprMiddleware from '@preprio/prepr-nextjs/middleware'
import { authMiddleware } from '@/lib/auth'
import { rateLimitMiddleware } from '@/lib/rate-limit'
export function middleware(request: NextRequest) {
let response = NextResponse.next()
// 1. Rate limiting
response = rateLimitMiddleware(request, response)
// 2. Authentication (if needed)
if (request.nextUrl.pathname.startsWith('/dashboard')) {
response = authMiddleware(request, response)
}
// 3. Custom headers
response.headers.set('x-custom-header', 'my-value')
// 4. Finally, Prepr middleware
return createPreprMiddleware(request, response, {
preview: process.env.PREPR_ENV === 'preview'
})
}import type { NextRequest, NextResponse } from 'next/server'
import createPreprMiddleware from '@preprio/prepr-nextjs/middleware'
export function middleware(request: NextRequest) {
const { pathname } = request.nextUrl
// Skip Prepr middleware for API routes
if (pathname.startsWith('/api/')) {
return NextResponse.next()
}
// Apply different logic based on route
let response = NextResponse.next()
if (pathname.startsWith('/blog')) {
response.headers.set('x-content-type', 'blog')
} else if (pathname.startsWith('/product')) {
response.headers.set('x-content-type', 'product')
}
// Always apply Prepr middleware for content routes
return createPreprMiddleware(request, response, {
preview: process.env.PREPR_ENV === 'preview'
})
}The toolbar should only be rendered in preview environments to avoid showing development tools in production. Here are several approaches for conditional rendering:
Update your app/layout.tsx:
import { getToolbarProps } from '@preprio/prepr-nextjs/server'
import {
  PreprToolbar,
  PreprToolbarProvider
} from '@preprio/prepr-nextjs/react'
import '@preprio/prepr-nextjs/index.css'

export default async function RootLayout({
  children,
}: {
  children: React.ReactNode
}) {
  const isPreview = process.env.PREPR_ENV === 'preview'
  const toolbarProps = isPreview ? await getToolbarProps(process.env.PREPR_GRAPHQL_URL!) : null

  return (
    <html lang="en">
      <body>
        {isPreview && toolbarProps ? (
          <PreprToolbarProvider props={toolbarProps}>
            <PreprToolbar />
            {children}
          </PreprToolbarProvider>
        ) : (
          children
        )}
      </body>
    </html>
  )
}For production applications, you may want more robust error handling:
import { getToolbarProps } from '@preprio/prepr-nextjs/server'
import {
  PreprToolbar,
  PreprToolbarProvider
} from '@preprio/prepr-nextjs/react'
import '@preprio/prepr-nextjs/index.css'

export default async function RootLayout({
  children,
}: {
  children: React.ReactNode
}) {
  const isPreview = process.env.PREPR_ENV === 'preview'
  const graphqlUrl = process.env.PREPR_GRAPHQL_URL

  // Only fetch toolbar props in preview mode with valid URL
  let toolbarProps = null
  if (isPreview && graphqlUrl) {
    try {
      toolbarProps = await getToolbarProps(graphqlUrl)
    } catch (error) {
      console.error('Failed to load toolbar:', error)
      // Continue without toolbar instead of breaking the app
    }
  }

  return (
    <html lang="en">
      <body>
        {isPreview && toolbarProps ? (
          <PreprToolbarProvider props={toolbarProps}>
            <PreprToolbar />
            {children}
          </PreprToolbarProvider>
        ) : (
          children
        )}
      </body>
    </html>
  )
}For better separation of concerns, create a dedicated component:
// components/PreviewWrapper.tsx
import { getToolbarProps } from '@preprio/prepr-nextjs/server'
import {
  PreprToolbar,
  PreprToolbarProvider
} from '@preprio/prepr-nextjs/react'

interface PreviewWrapperProps {
  children: React.ReactNode
}

export default async function PreviewWrapper({ children }: PreviewWrapperProps) {
  const isPreview = process.env.PREPR_ENV === 'preview'

  if (!isPreview) {
    return <>{children}</>
  }

  const toolbarProps = await getToolbarProps(process.env.PREPR_GRAPHQL_URL!)

  return (
    <PreprToolbarProvider props={toolbarProps}>
      <PreprToolbar />
      {children}
    </PreprToolbarProvider>
  )
}

// app/layout.tsx
import PreviewWrapper from '@/components/PreviewWrapper'
import '@preprio/prepr-nextjs/index.css'

export default function RootLayout({
  children,
}: {
  children: React.ReactNode
}) {
  return (
    <html lang="en">
      <body>
        <PreviewWrapper>
          {children}
        </PreviewWrapper>
      </body>
    </html>
  )
}- Performance: Prevents unnecessary API calls in production
- Security: Avoids exposing preview functionality to end users
- Bundle Size: Excludes toolbar code from production builds
- User Experience: Ensures clean production UI without development tools
- Environment Variables: Always use environment variables to control preview mode
- Error Boundaries: Wrap preview components in error boundaries to prevent crashes
- Fallback UI: Always provide a fallback when toolbar fails to load
- TypeScript Safety: Use proper type guards when checking conditions
- Bundle Optimization: Consider dynamic imports for preview-only code
// Dynamic import example for advanced optimization
const ToolbarDynamic = dynamic(
  () => import('@preprio/prepr-nextjs/react').then(mod => mod.PreprToolbar),
  {
    ssr: false,
    loading: () => <div>Loading preview tools...</div>
  }
)The tracking pixel is essential for collecting user interaction data and enabling personalization features. It should be included in all environments (both preview and production).
Add the tracking pixel to your layout's <head> section:
import { extractAccessToken } from '@preprio/prepr-nextjs/server'
import { PreprTrackingPixel } from '@preprio/prepr-nextjs/react'

export default function RootLayout({ children }: { children: React.ReactNode }) {
  const accessToken = extractAccessToken(process.env.PREPR_GRAPHQL_URL!)

  return (
    <html>
      <head>
        {accessToken && <PreprTrackingPixel accessToken={accessToken!} />}
      </head>
      <body>{children}</body>
    </html>
  )
}You can also place the tracking pixel in the body if needed:
export default function RootLayout({ children }: { children: React.ReactNode }) {
  const accessToken = extractAccessToken(process.env.PREPR_GRAPHQL_URL!)

  return (
    <html>
      <body>
        {accessToken && <PreprTrackingPixel accessToken={accessToken!} />}
        {children}
      </body>
    </html>
  )
}Use the getPreprHeaders() helper function in your data fetching to enable personalization and A/B testing:
import { getClient } from '@/lib/client'
import { GetPageBySlugDocument } from '@/gql/graphql'
import { getPreprHeaders } from '@preprio/prepr-nextjs/server'

const getData = async (slug: string) => {
  const { data } = await getClient().query({
    query: GetPageBySlugDocument,
    variables: { slug },
    context: {
      headers: await getPreprHeaders(),
    },
    fetchPolicy: 'no-cache',
  })
  return data
}import { getPreprHeaders } from '@preprio/prepr-nextjs/server'
const getData = async (slug: string) => {
const headers = await getPreprHeaders()
const response = await fetch(process.env.PREPR_GRAPHQL_URL!, {
method: 'POST',
headers: {
'Content-Type': 'application/json',
...headers,
},
body: JSON.stringify({
query: `
query GetPageBySlug($slug: String!) {
Page(slug: $slug) {
title
content
}
}
`,
variables: { slug },
}),
})
return response.json()
}Returns all Prepr headers for API requests.
import { getPreprHeaders } from '@preprio/prepr-nextjs/server'

const headers = await getPreprHeaders()
// Returns: { 'prepr-customer-id': 'uuid', 'Prepr-Segments': 'segment-id', ... }Returns the current customer ID from headers.
import { getPreprUUID } from '@preprio/prepr-nextjs/server'

const customerId = await getPreprUUID()
// Returns: 'uuid-string' or nullReturns the currently active segment.
import { getActiveSegment } from '@preprio/prepr-nextjs/server'

const segment = await getActiveSegment()
// Returns: 'segment-id' or nullReturns the currently active A/B testing variant.
import { getActiveVariant } from '@preprio/prepr-nextjs/server'

const variant = await getActiveVariant()
// Returns: 'A' | 'B' | nullFetches all necessary props for the toolbar component.
import { getToolbarProps } from '@preprio/prepr-nextjs/server'

const props = await getToolbarProps(process.env.PREPR_GRAPHQL_URL!)
// Returns: { activeSegment, activeVariant, data }Validates a Prepr GraphQL URL format.
import { validatePreprToken } from '@preprio/prepr-nextjs/server'

const result = validatePreprToken('https://graphql.prepr.io/YOUR_ACCESS_TOKEN')
// Returns: { valid: boolean, error?: string }Checks if the current environment is in preview mode.
import { isPreviewMode } from '@preprio/prepr-nextjs/server'

const isPreview = isPreviewMode()
// Returns: booleanExtracts the access token from a Prepr GraphQL URL.
import { extractAccessToken } from '@preprio/prepr-nextjs/server'

const token = extractAccessToken('https://graphql.prepr.io/abc123')
// Returns: 'abc123' or nullContext provider that wraps your app with toolbar functionality.
import { PreprToolbarProvider } from '@preprio/prepr-nextjs/react'

<PreprToolbarProvider props={toolbarProps}>
  {children}
</PreprToolbarProvider>The main toolbar component.
import { PreprToolbar } from '@preprio/prepr-nextjs/react'

<PreprToolbar />User tracking component that loads the Prepr tracking script.
import { PreprTrackingPixel } from '@preprio/prepr-nextjs/react'

<PreprTrackingPixel accessToken="your-access-token" />| Variable | Required | Default | Description |
|---|---|---|---|
PREPR_GRAPHQL_URL |
Yes | - | Your Prepr GraphQL endpoint URL |
PREPR_ENV |
Yes | - | Environment mode (preview or production) |
// Simple usage (creates new NextResponse)
createPreprMiddleware(request, {
  preview: boolean // Enable preview mode functionality
})

// Chaining usage (uses existing NextResponse)
createPreprMiddleware(request, response, {
  preview: boolean // Enable preview mode functionality
})<PreprToolbarProvider
props={toolbarProps}
options={{
debug: true // Enable debug logging
}}
>- Check environment: Ensure
PREPR_ENV=previewis set - Verify GraphQL URL: Make sure
PREPR_GRAPHQL_URLis correct and follows the formathttps://graphql.prepr.io/YOUR_ACCESS_TOKEN - Check token permissions: Ensure "Enable edit mode" is checked in Prepr
- Middleware setup: Verify middleware is properly configured
- API calls: Ensure you're using
getPreprHeaders()in your API calls - Environment: Check that environment variables are loaded
- Version compatibility: Ensure you're using compatible versions of Next.js and React
- Type imports: Import types from
@preprio/prepr-nextjs/types
- CSS imports: Make sure to import the CSS file in your layout
- Server components: Ensure server functions are only called in server components
The package includes comprehensive error handling:
import { PreprError } from '@preprio/prepr-nextjs/server'

try {
  const segments = await getPreprEnvironmentSegments(process.env.PREPR_GRAPHQL_URL!)
} catch (error) {
  if (error instanceof PreprError) {
    console.log('Error code:', error.code)
    console.log('Context:', error.context)
  }
}Enable debug logging in development:
<PreprToolbarProvider
  props={toolbarProps}
  options={{ debug: true }}
>The middleware automatically:
- Generates customer IDs: Creates unique visitor identifiers
- Tracks UTM parameters: Captures marketing campaign data
- Manages segments: Handles audience segmentation
- Processes A/B tests: Manages variant assignments
- Sets headers: Adds necessary headers for API calls
The toolbar provides:
- Segment selection: Switch between different audience segments
- A/B testing: Toggle between variants A and B
- Edit mode: Visual content editing capabilities
- Reset functionality: Clear personalization settings
When edit mode is enabled, the package:
- Scans content: Identifies editable content using Stega encoding
- Highlights elements: Shows proximity-based highlighting
- Provides overlays: Click-to-edit functionality
- Syncs with Prepr: Direct integration with Prepr's editing interface
If you're upgrading from v1, please follow the Upgrade Guide for detailed migration instructions.
MIT License - see the LICENSE file for details.
- Documentation: Prepr Documentation
- Issues: GitHub Issues
- Support: Prepr Support