This a Jointjs Diagram Editor that generates json base diagrams, then you can use the json to render the diagram in your application.
Live Demo: https://navidshad.github.io/ai-based-jointjs-diagram-editor/#/editor
- Drag and Drop.
- Drag and Create.
- Default KK Shapes.
- Primitive Shapes.
- Define configuration from Parent.
- Send receive diagram data between the app and parent frame.
- Add custom shapes (img based).
- Create Link between elements.
- Move elements.
- Edit Shape properties.
- Add custom images.
- Import/Export json data.
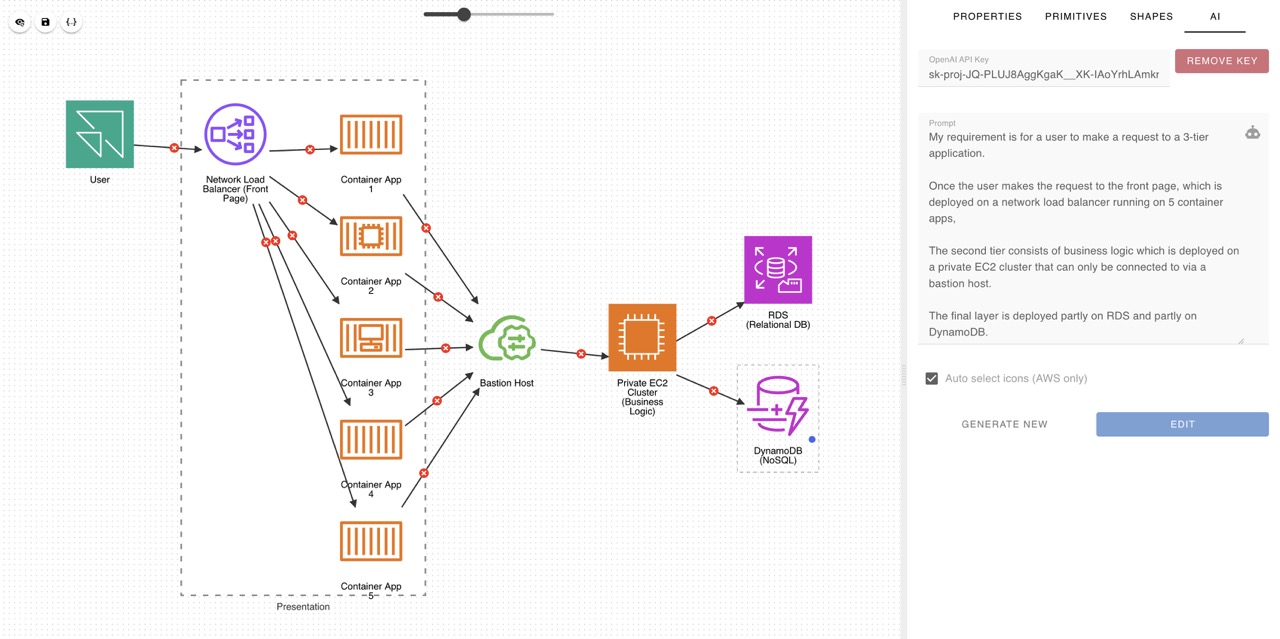
- Create and Manipulate Diagram by GPT-4.
- Group a sort of elements (only in ai result for now).
- diagram-designer
- Node.js 18+
- npm or yarn
# Clone the repository
git clone <repository-url>
cd diagram-designer

# Install dependencies
npm install

# Start development server
npm run dev
The editor will be available at http://localhost:5173
Before running the application, you may need to configure environment variables:
# AI Configuration
VITE_OPENAI_API_KEY=your_api_key
VITE_AI_MODEL=gpt-4

# App Configuration
VITE_APP_NAME=Diagram Designer
VITE_BASE_URL=/diagram-designer/# Build for production
npm run build
# Preview production build
npm run previewThis Editor is designed to be embedded as an iframe and communicates with parent applications through the PostMessage API. It's currently used by several KodeKloud designer apps like Quiz-Designer.
The editor communicates with parent applications through structured messages:
| Events | Examples | Stream Type | Description |
|---|---|---|---|
ready |
{type:"ready"} |
receive | To Send ready signal to parent |
graph |
{type:"graph", payload: {cells:[]}} |
send/receive | To exchange diagram data |
settings |
{type:"settings", payload: SettingsObject} |
send | To set editor settings |
element-add |
{type:"element-add", payload: {ElementObject} |
receive | To know when element added |
element-remove |
{type:"element-del", payload: {id: string}} |
receive | To know when element removed |
element-select |
{type:"element-update", payload: {ElementObject}} |
receive | To know when element selected |
You can configure the editor through the settings object sent via PostMessage:
| Property | type | Description |
|---|---|---|
update_per_change |
Boolean |
Receive diagram update per any change on its graph |
toggle_control_panel |
Boolean |
Show/Hide control panel |
<iframe id="diagram-editor" src="/diagram-editor"></iframe>

<script>
const iframe = document.getElementById('diagram-editor')

// Send initial configuration
iframe.onload = () => {
  iframe.contentWindow.postMessage({
    type: 'settings',
    payload: {
      update_per_change: true,
      toggle_control_panel: true
    }
  }, '*')
}

// Listen for events from editor
window.addEventListener('message', (event) => {
  if (event.data.type === 'ready') {
    console.log('Editor ready')
  }

  if (event.data.type === 'graph') {
    // Save diagram data
    saveDiagram(event.data.payload)
  }

  if (event.data.type === 'element-add') {
    console.log('Element added:', event.data.payload)
  }
})
</script>The Diagram Designer is a Vue 3 + TypeScript application built with JointJS for creating interactive diagrams. It's designed to be embedded as an iframe and communicates with parent applications through the PostMessage API. The editor supports AI-powered diagram generation using LangChain.
- Frontend Framework: Vue 3 with Composition API
- Type System: TypeScript
- Diagram Engine: JointJS 3.7.7
- State Management: Pinia
- UI Components: Vuetify 3.4.6
- AI Integration: LangChain
- Build Tool: Vite
- Testing: Vitest + Playwright
src/
├── ai/                    # AI integration (LangChain)
│   ├── chains/           # AI chain definitions
│   ├── schema/           # Zod schemas for AI
│   ├── helpers/          # AI utilities
│   ├── llms/            # LLM configurations
│   └── assets/          # AI prompts and templates
├── components/          # Vue components
│   ├── ControlPanel/    # Right panel components
│   └── layout/          # Layout components
├── stores/              # Pinia stores
├── model/               # Data models
├── services/            # Business logic services
├── types/               # TypeScript type definitions
├── helpers/             # Utility functions
├── router/              # Vue Router configuration
├── plugins/             # Vue plugins
├── static/              # Static assets
└── views/               # Main application views
The main editor uses a split-panel layout:
- Left Panel: Diagram canvas with action header
- Right Panel: Control panel (collapsible)
// Key features:
- Responsive split layout
- Dynamic panel sizing
- Configurable panel visibilityThe core drawing surface built on JointJS:
- Interactive diagram editing
- Element manipulation (drag, resize, connect)
- Tool integration (selection, resize handles)
- Custom shape support
Tabbed interface for editor controls:
- Shapes: Shape library and custom shapes
- Primitives: Basic geometric shapes
- Properties: Element property editor
- Hierarchy: Element tree view
- AI: AI-powered diagram generation
Manages the diagram state and JointJS integration:
interface DiagramStore {
  graph: dia.Graph              // JointJS graph
  paper: dia.Paper             // JointJS paper
  hierarchyStore: HierarchyStore // Element hierarchy
}

// Key methods:
- insertDiagramData(data)     // Load diagram from JSON
- addElement(element)         // Add new element
- addLink(source, target)     // Create link between elements
- setViewportPosition(x, y)   // Pan viewport
- setZoomLevel(level) // Zoom controlManages application configuration and iframe communication:
interface Settings {
  update_per_change: boolean    // Auto-sync changes
  toggle_control_panel: boolean // Show/hide control panel
}

// Key methods:
- updateParentWindowWithGraph(data)          // Send diagram data
- updateParentWindowWithElementTransaction() // Send element events
- insertSettings(settings) // Apply settings from parentThe AI system uses LangChain for natural language to diagram conversion:
src/ai/
├── chains/
│   ├── diagram-generator.chain.ts      # Text → Diagram
│   ├── diagram-generator-csv.chain.ts  # CSV → Diagram
│   ├── diagram-manipulation.chain.ts   # Modify existing
│   └── prompt-improviser.chain.ts      # Improve prompts
├── schema/                             # Zod validation schemas
└── llms/                              # LLM configurations
- Diagram Generator: Converts natural language descriptions to JointJS diagrams
- CSV Generator: Creates diagrams from CSV data
- Diagram Manipulator: Modifies existing diagrams based on instructions
- Prompt Improviser: Enhances user prompts for better results
# Install dependencies
npm install

# Start development server with hot reload
npm run dev

# Run tests
npm run test:unit    # Unit tests with Vitest
npm run test:e2e     # E2E tests with Playwright

# Code quality
npm run lint         # ESLint
npm run format       # Prettier
npm run type-check # TypeScript checkingVSCode + Volar (and disable Vetur) + TypeScript Vue Plugin (Volar).
- ESLint: Linting with Vue and TypeScript rules
- Prettier: Code formatting
- TypeScript: Strict type checking
- Vitest: Unit testing
- Playwright: E2E testing
- Vue DevTools: Browser extension for Vue debugging
- JointJS Inspector:
paper.options.interactivefor element inspection - Console Logging: Extensive logging in stores and services
The shape creation pattern is simple: Button → Function → diagramStore.addElement()
Template:
<template>
  <!-- 1. UI Trigger (button, form, etc.) -->
  <v-btn @click="addMyShape">Add My Shape</v-btn>
</template>
Script:
<script setup>
import { useDiagramStore } from '@/stores/diagram'
import { shapes } from 'jointjs'

const diagramStore = useDiagramStore()

// 2. Function that creates and adds element
function addMyShape() {
  // 3. Create JointJS element
  const element = new shapes.standard.Rectangle()
  element.position(100, 100)
  element.size(120, 80)
  element.attr('body/fill', 'lightcoral')
  element.attr('label/text', 'My Custom Shape')

  // 4. Add to diagram store (automatic hierarchy registration)
  diagramStore.addElement(element)
}
</script>- Use Standard JointJS Shapes:
shapes.standard.Rectangle,shapes.standard.Image,shapes.standard.Polygon - Configure via Attributes: Use
attr()for visual properties,prop()for data - One Function Call:
diagramStore.addElement()handles everything else - Automatic Integration: Hierarchy registration, tools, events all happen automatically
- Create Chain File:
// src/ai/chains/my-chain.ts
export class MyChain extends BaseChain {
  async call(inputs: MyInputs): Promise<MyOutputs> {
    // Chain logic
  }
}- Register Chain:
// src/ai/index.ts
export { MyChain } from './chains/my-chain'- Integrate in Component:
// Use in ControlPanelAi.vue
import { MyChain } from '@/ai'The control panel uses a fixed tab structure in ControlPanel.vue. To add a new tab:
1. Add the tab and window item in ControlPanel.vue:
Template:
<v-tabs v-model="tab" align-tabs="center" class="w-full mb-2">
  <v-tab value="properties">Properties</v-tab>
  <v-tab value="primitives">Primitives</v-tab>
  <v-tab value="shapes">Shapes</v-tab>
  <v-tab value="ai">AI</v-tab>
  <v-tab value="mynew">My New Tab</v-tab> <!-- Add new tab -->
</v-tabs>

<v-window class="flex-1 h-full" v-model="tab">
  <!-- existing window items -->
  <v-window-item value="mynew" class="h-full">
    <control-panel-mynew />
  </v-window-item>
</v-window>
Script:
import ControlPanelMynew from './ControlPanelMynew.vue'

export default defineComponent({
  components: {
    ControlPanelShapes,
    ControlPanelProperties,
    ControlPanelPrimitives,
    ControlPanelAi,
    ControlPanelMynew // Add component
  },
  // ... rest stays the same
})
2. Create your tab component in src/components/ControlPanel/ControlPanelMynew.vue:
Template:
<template>
  <v-card variant="plain">
    <v-card-text>
      <!-- Your tab content here -->
      <v-btn @click="addMyElement">Add Element</v-btn>
    </v-card-text>
  </v-card>
</template>
Script:
<script setup lang="ts">
import { useDiagramStore } from '@/stores/diagram'

const diagramStore = useDiagramStore()

function addMyElement() {
  // Button → Function → diagramStore.addElement()
  diagramStore.addElement(/* your element config */)
}
</script>The ControlPanelPropertiesElementProperties.vue component is responsible for managing all element properties in the editor. It provides a reactive interface between the UI controls and JointJS element attributes.
Component Architecture:
- Receives
itemIdprop from parent hierarchy selection - Finds element via
diagramStore.hierarchyStore.find(itemId) - Maintains reactive state for all editable properties
- Bidirectional sync between UI controls and element attributes
Property Categories Handled:
// Core properties maintained as reactive refs
const label = ref('')                    // Element label text
const color = ref('')                    // Fill color (body/fill attribute)
const hasTextWrap = ref(false)          // Text wrapping toggle
const textWrap = ref({ width: 0, height: 0, ellipsis: true })
const size = ref({ width: 0, height: 0 }) // Element dimensions
Reactive Synchronization Pattern:
// 1. Initialize from element when itemId changes
watch(() => props.itemId, (value: string | null) => {
  if (!value) return

  // Read from element attributes
  label.value = item.value?.name as string
  color.value = item.value?.element.attr('body/fill') as string
  size.value = item.value?.element.size() || { width: 0, height: 0 }
  hasTextWrap.value = item.value?.element.attr('label/textWrap') != null
  // ... etc
})

// 2. Write back to element when properties change
watch(() => label.value, (value: string) => {
  item.value?.changeLabel(value)
})

watch(() => color.value, (value: string) => {
  item.value?.element.attr('body/fill', value)
})- Use Pinia stores for global state
- Keep components reactive with
ref()andcomputed() - Avoid direct graph manipulation outside stores
- Always use store methods for graph operations
- Register event listeners in stores, not components
- Use TypeScript interfaces for element definitions
- Lazy load control panel components
- Debounce frequent operations (pan, zoom)
- Use
v-showinstead ofv-iffor toggles - Minimize JointJS paper redraws
- Test store methods independently
- Mock JointJS in unit tests
- Use Playwright for iframe communication testing
Problem: Paper appears blank or elements don't show Solution: Ensure paper is properly initialized with valid container
// Correct initialization
const paper = new dia.Paper({
  el: containerElement,
  model: graph,
  width: containerWidth,
  height: containerHeight
})Problem: PostMessage events not received Solution: Check event origin and data structure
// Add origin validation
if (event.origin !== expectedOrigin) return

// Validate event data structure
if (!eventData.type || !eventData.payload) returnProblem: LangChain chains failing Solution: Validate input schemas and API keys
// Use Zod for validation
const validatedInput = inputSchema.parse(userInput)Problem: Components not properly cleaned up
Solution: Remove event listeners in onUnmounted
onUnmounted(() => {
  graph.off('change', changeHandler)
  paper.off('cell:pointerdown', clickHandler)
})These patterns represent the fundamental architectural decisions that make the diagram editor extensible and maintainable. Understanding these patterns is essential for adding new features or modifying existing behavior.
The hierarchy system is the backbone of element management in the editor. It acts as a state management layer between JointJS's low-level graph operations and Vue's reactive UI components. This pattern ensures that every element in the diagram has a corresponding state object that can be efficiently queried, manipulated, and synchronized.
Why This Pattern?
- Single Source of Truth: All element state lives in one place
- Event-Driven: Changes propagate automatically through the system
- Type Safety: TypeScript interfaces ensure consistent element handling
- Tool Management: Visual interaction tools are centrally managed
HierarchyItem Model (src/model/hierarchy.model.ts):
export class HierarchyItem {
  id: string                    // Unique identifier
  name: string                  // Display name
  element: dia.Element          // JointJS element reference
  toolsViewList: ToolsViewItem[] // Associated tools (hover, selection)

  // Key methods:
  getToolsView(type)           // Get specific tool
  changeLabel(name)            // Update element label
}

export class HierarchyGroupItem extends HierarchyItem {
  // Special handling for group elements
  // Auto-moves child elements when group moves
  ChieldsId: string[]          // Child element IDs
}
HierarchyStore Service (src/services/hierarchy-store.service.ts):
export class HierarchyStore {
  private _data: HierarchyItem[]  // Element registry
  _eventBus: TinyEmitter         // Event system

  // Key methods:
  add(item)                     // Register new element
  remove(id)                    // Unregister element
  find(id)                      // Find by ID
  activeItem(item)              // Show tools for element
  blurAll()                     // Hide all tools
  addEvent(type, callback)      // Listen to hierarchy events
}The control panel uses a component composition pattern with Vuetify's tab system to create modular, reusable interfaces. Each tab is an independent Vue component that follows consistent patterns for element creation and user interaction.
Why This Pattern?
- Modularity: Each tab can be developed independently
- Consistency: All tabs follow the same interaction patterns
- Extensibility: New tabs can be added without modifying existing code
- Separation of Concerns: Each tab handles one specific aspect of the editor
Direct Store Access Pattern (Most Common):
// Each tab component directly accesses diagram store
import { useDiagramStore } from '@/stores/diagram'

const diagramStore = useDiagramStore()

function addElement() {
  // Button → Function → Store → Graph → Hierarchy → Events
  diagramStore.addElement(elementConfig)
}The event system implements a message-passing architecture that enables seamless integration between the diagram editor (running in an iframe) and parent applications. This pattern provides real-time synchronization, configuration management, and event notification without tight coupling.
Why This Pattern?
- Security: PostMessage API is browser-secure for cross-origin communication
- Loose Coupling: Parent and editor can be developed independently
- Real-Time Sync: Changes propagate immediately between iframe and parent
- Bidirectional: Both parent and editor can send/receive events
- Event Safety: Built-in loop prevention and origin validation
Automatic Graph Sync:
// In diagram store - onChange triggered by JointJS events
graph.on('change', () => onChange())
graph.on('add', () => onChange())
graph.on('remove', () => onChange())

function onChange() {
  if (configStore.updatePerChange == true) {
    // Send entire graph to parent on every change
    configStore.updateParentWindowWithGraph(graph.toJSON())
  }
}
Element Lifecycle Events:
// Hierarchy store automatically emits events
hierarchyStore.add(item)    // → 'element-add' to parent
hierarchyStore.remove(id)   // → 'element-remove' to parent
hierarchyStore.select(item) // → 'element-select' to parent