



- Introduction
- Installation
- Examples
- Comparing figures
- Roadmap
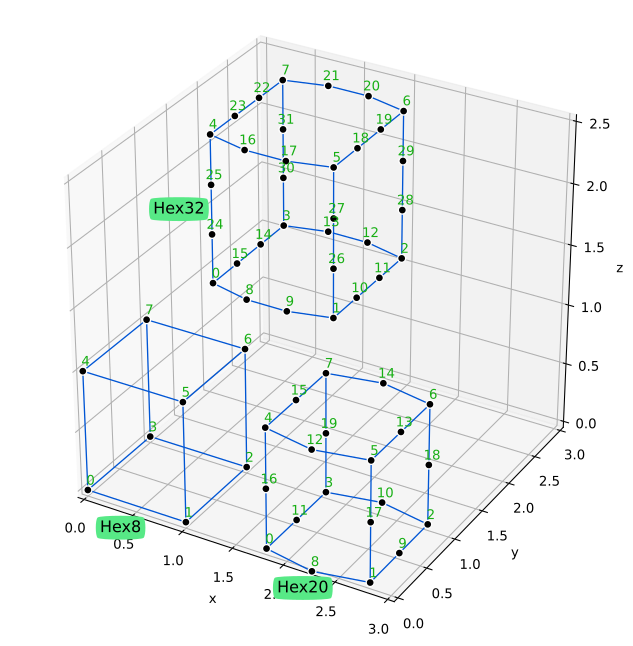
- Appendix A - Shapes and local numbering of nodes
- Appendix B - Geometry versus space dimensions
This crate contains structures and functions for geometry computations, generate meshes, and perform numerical integration for finite element analyses (FEM/FEA).
This crate builds with no external numerical library: russell_lab 4 ships pure-Rust BLAS/LAPACK kernels, so a plain cargo build works on a machine with no numerical library at all. The tests and examples that draw figures need Python 3 with Matplotlib (plotpy).
The following optional (Rust) features are available:
open_blas: Use OpenBLAS for the dense kernels (needs its development headers)intel_mkl: Use Intel oneAPI MKL for the dense kernels; takes precedence overopen_blaswhen both are enabled
Without either feature the build keeps the native Rust kernels. The Russell README has the installation steps for each platform.
The build needs nothing beyond the Rust toolchain. For the tests and examples that draw figures, install Matplotlib:
pacman -Syu python-matplotlibFor the OpenBLAS accelerator, install it and enable open_blas:
pacman -Syu blas-openblas[dependencies]
gemlab = { version = "*", features = ["open_blas"] }Intel MKL is installed with zscripts/arch-install-intel-toolkit.bash and enabled with intel_mkl; see the Russell README for the remaining steps.
The build needs nothing beyond the Rust toolchain. For the tests and examples that draw figures, install Matplotlib:
sudo apt-get install -y python3-matplotlibFor the OpenBLAS accelerator, install it and enable open_blas:
sudo apt-get install -y libopenblas-dev[dependencies]
gemlab = { version = "*", features = ["open_blas"] }Intel MKL is installed from the Intel oneAPI toolkit and enabled with intel_mkl; see the Russell README.
The MSH file format contains three mandatory sections and two optional sections. The MSH file is a plain text file where comments are marked with # and empty lines are allowed. The mandatory sections are header, points, and cells. We use "cells" here to refer to 2D polygons or 3D polyhedra (aka Elements in the Finite Element Method). The header section specifies the space dimension (2 or 3), the number of points, the number of cells, and the optional number of marked edges and faces. The optional sections specify the marked edges and faces. An example of MSH file is shown below:
#
#           8-------------11
#          /.             /|
#     {-5}/ .        {-5}/ |
#        /  .   {-9}    /  |{123}
#       /   .          /   |       id = 1
# 2.0  9-------------10    |       marker = 2
#      |    .         |    |
#      |    4---------|----7*
#      |   /.         |   /|
#      |  / .         |  / |
#      | /  .         | /  |{-4}
#      |/   .         |/   |
# 1.0  5--------------6    |       id = 0
#      |    .         |{-8}|       marker = 1
#      |    0---------|----3  0.0
#      |   /          |   /
#      |  /           |  /
#      | /            | /
#      |/             |/
# 0.0  1*-------------2*  1.0
#     0.0            1.0
#
# header
# ndim npoint ncell nmarked_edge nmarked_face
     3     12     2            4            2

# points
# id marker x y z
   0  0 0.0 0.0 0.0
   1 -1 1.0 0.0 0.0
   2 -1 1.0 1.0 0.0
   3  0 0.0 1.0 0.0
   4  0 0.0 0.0 1.0
   5  0 1.0 0.0 1.0
   6  0 1.0 1.0 1.0
   7 -1 0.0 1.0 1.0
   8  0 0.0 0.0 2.0
   9  0 1.0 0.0 2.0
  10  0 1.0 1.0 2.0
  11  0 0.0 1.0 2.0

# cells
# id marker kind points
   0  1  hex8  0 1 2 3 4 5  6  7
   1  2  hex8  4 5 6 7 8 9 10 11

# marked edges
# marker p1 p2
123 7 11
-5 11 10
-4 7 3
-5 8 9

# marked faces
# marker p1 p2 p3 {p4}
-8 3 2 7 6
-9 8 10 9 11
use gemlab::integ::Gauss;
use gemlab::mesh::{At, Features, Mesh};
use gemlab::shapes::Scratchpad;
use gemlab::StrError;
use std::collections::HashSet;

fn main() -> Result<(), StrError> {
    // Input the raw mesh data using a text file
    //
    // 1.0  5------,6.------7
    //      | [3],'   `.[4] |
    //      |  ,'       `.  |
    //      |,'           `.|
    // 0.5  3      [2]      4
    //      |`.           .'|
    //      |  `.       .'  |
    //      | [0]`.   .'[1] |
    // 0.0  0------`1'------2
    //     0.0     0.5     1.0
    let path = "./data/meshes/four_tri3_one_qua4.msh";
    let mesh = Mesh::read(path)?;

    // Extract features such boundary edges and faces.
    // Search entities along the boundary of the mesh given coordinates.
    // The `At` enum provides an easy way to define the type of the
    // constraint such as line, plane, circle, etc.
    let feat = Features::new(&mesh, false);
    assert_eq!(feat.search_point_ids(At::Y(0.5), |_| true)?, &[3, 4]);
    assert_eq!(feat.search_edge_keys(At::X(1.0), |_| true)?, &[(2, 4), (4, 7)]);

    // Perform numerical integration to compute
    // the area of cell # 2
    let ndim = 2;
    let cell_2 = &mesh.cells[2];
    let mut pad = Scratchpad::new(ndim, cell_2.kind)?;
    mesh.set_pad(&mut pad, &cell_2.points);
    let gauss = Gauss::new(cell_2.kind);
    let mut area = 0.0;
    for p in 0..gauss.npoint() {
        let iota = gauss.coords(p);
        let weight = gauss.weight(p);
        let det_jac = pad.calc_jacobian(iota)?;
        area += weight * det_jac;
    }
    assert_eq!(area, 0.5);
    Ok(())
}The tests that draw meshes (e.g., in src/mesh/draw.rs) save their SVG output to
/tmp/gemlab, while the committed reference figures live in data/figures. The
script zscripts/compare-figures.py compares the generated figures against the
references and reports which ones are identical, different, or missing.
It offers two comparison modes:
- Text mode (default) — normalises both SVGs before comparing: it removes the
<!DOCTYPE>, XML comments, and the<metadata>block (which holds a timestamp and the Matplotlib version), and rounds floating-point numbers (--decimals). This catches real content differences while ignoring Matplotlib noise. - Raster mode (
--raster) — rasterises both SVGs to PNG at the same pixel width (usingrsvg-convert,inkscape, or ImageMagick, whichever is installed) and compares pixels. It reports the mean absolute error, the percentage of differing pixels, and the maximum delta; this is tolerant to Matplotlib-version and anti-aliasing differences.
Both modes are selected with --pattern and can emit a machine-readable summary
with --json. In raster mode, --diff-image DIR additionally writes a red
diff heat-map and a side-by-side PNG for every differing figure. The exit status
is 0 only when every compared figure is identical (or within tolerance) and none
is missing, which makes the tool suitable for CI.
# text compare of the figures produced by the draw.rs tests
./zscripts/compare-figures.py --pattern 'test_draw_*.svg'

# show a unified diff for the figures that differ
./zscripts/compare-figures.py --pattern 'test_draw_*.svg' --diff

# pixel compare (tolerant to Matplotlib version differences), writing diff images
./zscripts/compare-figures.py --pattern 'test_draw_*.svg' --raster \
    --pixel-tol 24 --max-diff-pct 1.0 --diff-image /tmp/gemlab/diffs

# refresh the committed reference figures from the current output
# (review the differences first!)
./zscripts/compare-figures.py --pattern 'test_draw_*.svg' --update
Run ./zscripts/compare-figures.py --help for the full list of options.
Raster mode requires numpy and Pillow in addition to a SVG rasteriser.
- Implement read/write mesh functions
- Add tests for the numerical integrations
- Implement triangle and tetrahedron generators
- Implement drawing functions
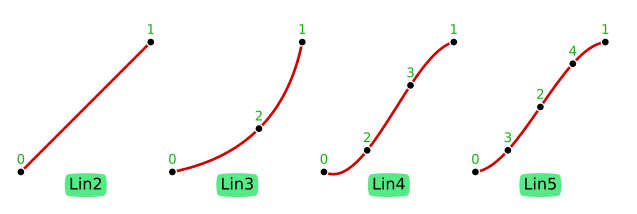
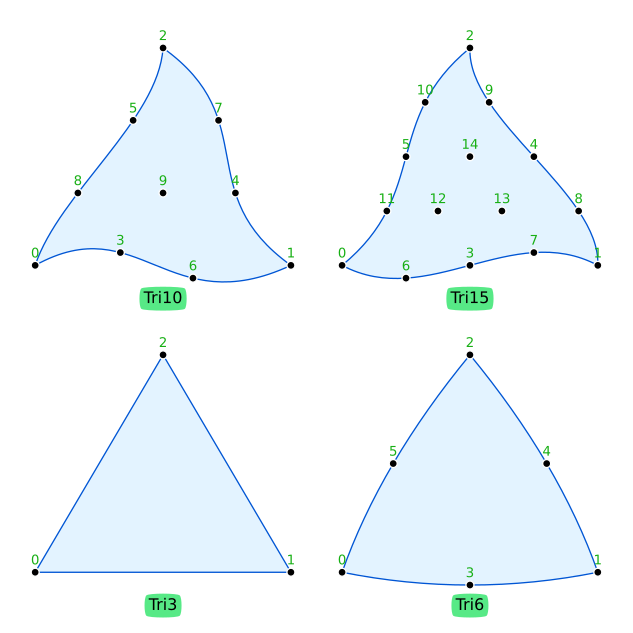
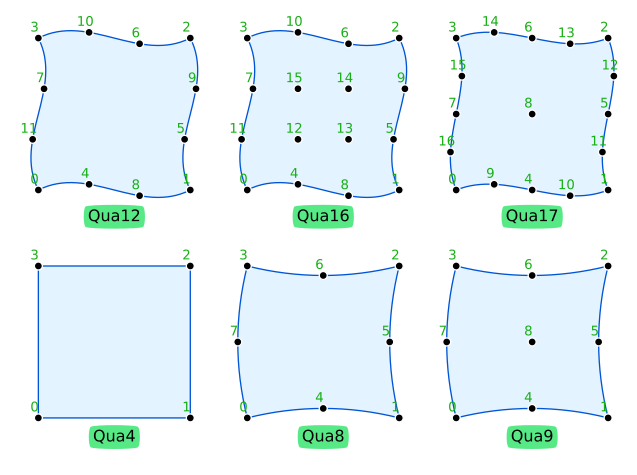
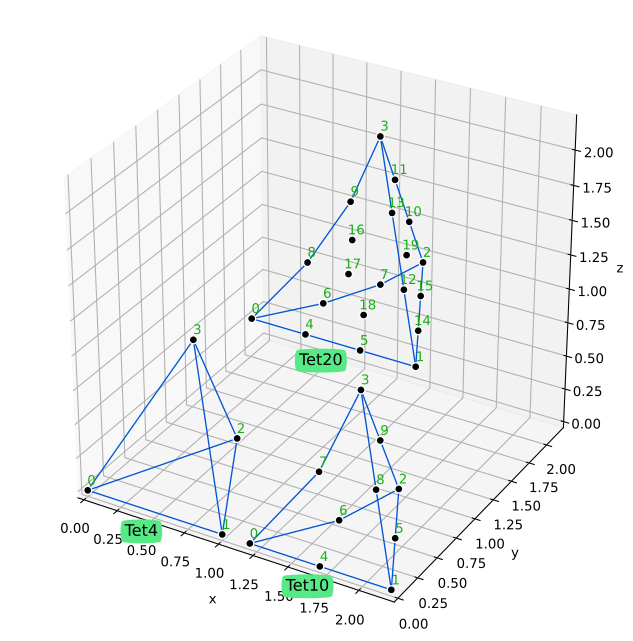
The following table shows what combinations of geometry-number-of-dimensions (geo_ndim) and
space-number-of-dimensions (space_ndim) are possible. There are three cases:
- Case
CABLE--geo_ndim = 1andspace_ndim = 2 or 3; e.g., line in 2D or 3D (cables and rods) - Case
SHELL--geo_ndim = 2andspace_ndim = 3; e.g. Tri or Qua in 3D (shells and surfaces) - Case
SOLID--geo_ndim = space_ndim; e.g., Tri and Qua in 2D or Tet and Hex in 3D
geo_ndim |
space_ndim = 2 |
space_ndim = 3 |
|---|---|---|
| 1 | CABLE |
CABLE |
| 2 | SOLID |
SHELL |
| 3 | impossible | SOLID |