Project 4: Custos Deployment
Thanks to isuru, TAs and team scapsulators, team DSDummies, and team Terra for their valuable insights. All this wiki instructions and isuru guidance helped us to deployed Custos successfully.
- Spawn four instances on Jetstream 2 of medium size
- Install Rancher on one of the instances
To install Rancher please refer to our peer team Terra's writeup: https://github.com/airavata-courses/terra/wiki/Installing-Rancher---Step--1
- Make a k8s cluster: Please refer to https://github.com/airavata-courses/terra/wiki/Step-2:-Setting-up-Kubernetes-cluster-using-Rancher
While adding the nodes to the cluster, choose the calico network
Now that your Rancher and cluster are done, log in to the master node
-
Create Namespaces: Custos, Keycloak, Vault
-
Install helm: https://helm.sh/docs/intro/install/
git clone https://github.com/airavata-courses/SuperNova.git

git checkout project-4

cd CUSTOS/custos_deploy/
On all the nodes,
sudo mkdir /bitnami
sudo mkdir /bitnami/mysql
sudo mkdir /bitnami/postgresql
sudo mkdir /hashicorp
sudo mkdir /hashicorp/consul
sudo mkdir /hashicorp/consul/data

chmod 777 -R /hashicorp
Make sure you change the permissions for all directories for hashicorp/consul/data
Also, whichever service you're deploying, always go into that service directory before executing the steps.
cd cert-manager
> kubectl apply -f https://github.com/cert-manager/cert-manager/releases/download/v1.8.0/cert-manager.yaml
check output:
kubectl get all -n cert-manager
All the pods should be in the running phase. If not, there would be an error so check the kubectl logs to debug the issue.
> kubectl apply -f issuer.yaml
cd ..
cd keycloak
helm repo add bitnami https://charts.bitnami.com/bitnami
cd postgres
Create PVs Create three PVs for each mount point /bitnami/postgresql
kubectl apply -f pv.yaml,pv1.yaml,pv2.yaml
Then deploy PostgreSQL
helm install keycloak-db-postgresql bitnami/postgresql -f values.yaml -n keycloak --version 10.12.3
cd ..

kubectl create -f https://raw.githubusercontent.com/operator-framework/operator-lifecycle-manager/master/deploy/upstream/quickstart/crds.yaml

kubectl create -f https://raw.githubusercontent.com/operator-framework/operator-lifecycle-manager/master/deploy/upstream/quickstart/olm.yaml

git clone https://github.com/keycloak/keycloak-operator

cp operator.yaml keycloak-operator/deploy/

cd keycloak-operator

make cluster/prepare

kubectl apply -f deploy/operator.yaml -n keycloak

cd ..

kubectl apply -f keycloak-db-secret.yaml -n keycloak

kubectl apply -f custos-keycloak.yaml -n keycloak

* Replace hostname in ingress.yaml

kubectl apply -f ingress.yaml -n keycloak
user: admin
Get admin password.
kubectl get secret credential-custos-keycloak -o yaml -n keycloak

echo "passwordhere" | base64 --decode
Store this password, it would be used in further steps
cd consul
helm repo add hashicorp https://helm.releases.hashicorp.com
Create directory /hashicorp/consul/data in each of your nodes
sudo chmod 777 -R hashichorp
kubectl apply -f pv.yaml,pv1.yaml
kubectl apply -f storage.yaml
helm install consul hashicorp/consul --version 0.31.1 -n vault --values config.yaml
cd vault
helm install vault hashicorp/vault --namespace vault -f values.yaml --version 0.10.0
Change hostname in ingress.yaml
Deploy Ingress
kubectl apply -f ingress.yaml -n vault
At this point, your output should something like this:
-
Follow instructions in UI which is hosted on 443 to generate vault token.
-
Put in 5 and 3 to initialize the keys. It would generate 5 keys, and download the keys in the file.
-
In the next step , put the keys in the UI one by one to unseal the vault
After this step, your UI should look like:
The root_token to be used would be found at the end of the file you downloaded.
-
Other way to do (if you don't want to follow through the UI instructions ): Follow step 4 and step 5 from this: https://dwops.com/blog/deploy-hashicorp-vault-on-kubernetes-using-helm/
-
You shall see the vault-0 pod in the vault namespace change from 0/1 to 1/1 Ready phase.
cd mysql
kubectl apply -f pv.yaml,pv1.yaml
helm install mysql bitnami/mysql -f values.yaml -n custos --version 8.8.8
Label this for all your nodes in the cluster, replace node_name with all your cluster nodes
kubectl label nodes node_name custosServiceWorker="enabled"
On master node, execute these steps:
kubectl delete all --all -n ingress-nginx

kubectl apply -f https://raw.githubusercontent.com/kubernetes/ingress-nginx/controller-v0.44.0/deploy/static/provider/baremetal/deploy.yaml
Now make these code changes on a spare VM on Jetstream:
git clone https://github.com/apache/airavata-custos.git
cd airavata-custos
git checkout develop
Parameters to be added in root pom.xml
UserProfile: dev
Hostname: {Hostname}
SSH_user: {user}
SSH_user_password: {your passwd}
SSH_key: your key path
Keycloak_username: admin
Keycloak_password: keycloak_pass
vault_token: vault_token
MYSQL_user: user
MYSQL_password: pass
docker_repo: {your docker hub repo }
Changes to be made,
-
custos-core-services/utility-services/custos-configuration-service/pom.xml --> change skipped to false
-
custos-core-services/utility-services/custos-configuration-service/resource/*-dev.properties
custos-core-services/utility-services/custos-configuration-service/resource/*-staging.properties
change iam.server.url=https://{host-name}:30079/auth/
- Open custos-integration-services/tenant-management-service-parent/tenant-management-service/src/main/java/tasks/TenantActivationTask.java
comment lines 225-249
  In pom.xml, make sure you change these lines :
         <vault.scheme>http</vault.scheme>
         <vault.host>vault.vault.svc.cluster.local</vault.host>
         <vault.port>8200</vault.port>
         <vault.uri>http://vault.vault.svc.cluster.local:8200</vault.uri>
-
Create folder custos/artifacts in home directory of master and give 777 permission
-
Create a new Jetstream instance where you shall be running the next steps as it doesn't works on local. [Note: Do not install any system or VM for further steps which has kubernetes install.]
-
On the new instance , execute the following commands:
sudo apt get install maven
generate ssh-key with the command as the normal ssh private key doesn't works:
ssh-keygen -t rsa -b 4096 -m pem
Login Docker
docker login
Go to .m2 folder
cd ~/.m2
vim setting.xml
Paste this contain in console [update the docker hub uername password
<settings xmlns="http://maven.apache.org/SETTINGS/1.0.0"
xmlns:xsi="http://www.w3.org/2001/XMLSchema-instance"
xsi:schemaLocation="http://maven.apache.org/SETTINGS/1.0.0
                    http://maven.apache.org/xsd/settings-1.0.0.xsd">

<servers>
    <server>
      <id>docker.io</id>
      <username>CHANGE_ME</username>
      <password>CHANGE_ME</password>
    </server>
</servers>
</settings>
Save the setting.xml file:
:wq!
GO BACK to airvata-custos folder to perform further steps
cd -
Build code
`mvn clean install -P container`
Push code images to repo
`mvn dockerfile:push -P container`
deploy artifacts
mvn antrun:run -P scp-to-remote`
Custos deployed on dev:

Run the following command now once your dev Custos pods are running:
helm install cluster-management-core-service /home/ssh_user/custos/artifacts/cluster-management-core-service-1.1-SNAPSHOT.tgz -n keycloak
- Delete the following services step by now (which are deployed on dev):
iam-admin-core-service(On Master node):
helm uninstall iam-admin-core-service -n custos
Make these code changes in root pom.xml
<spring.profiles.active>staging</spring.profiles.active>
cd iam-admin-cc-service/
sudo mvn clean install -P container
sudo mvn dockerfile:push -P container
sudo mvn antrun:run -P scp-to-remote
identity-core-service(on master node)
helm uninstall identity-core-service -n custos
cd identity-core-service/
sudo mvn clean install -P container
sudo mvn dockerfile:push -P container
sudo mvn antrun:run -P scp-to-remote
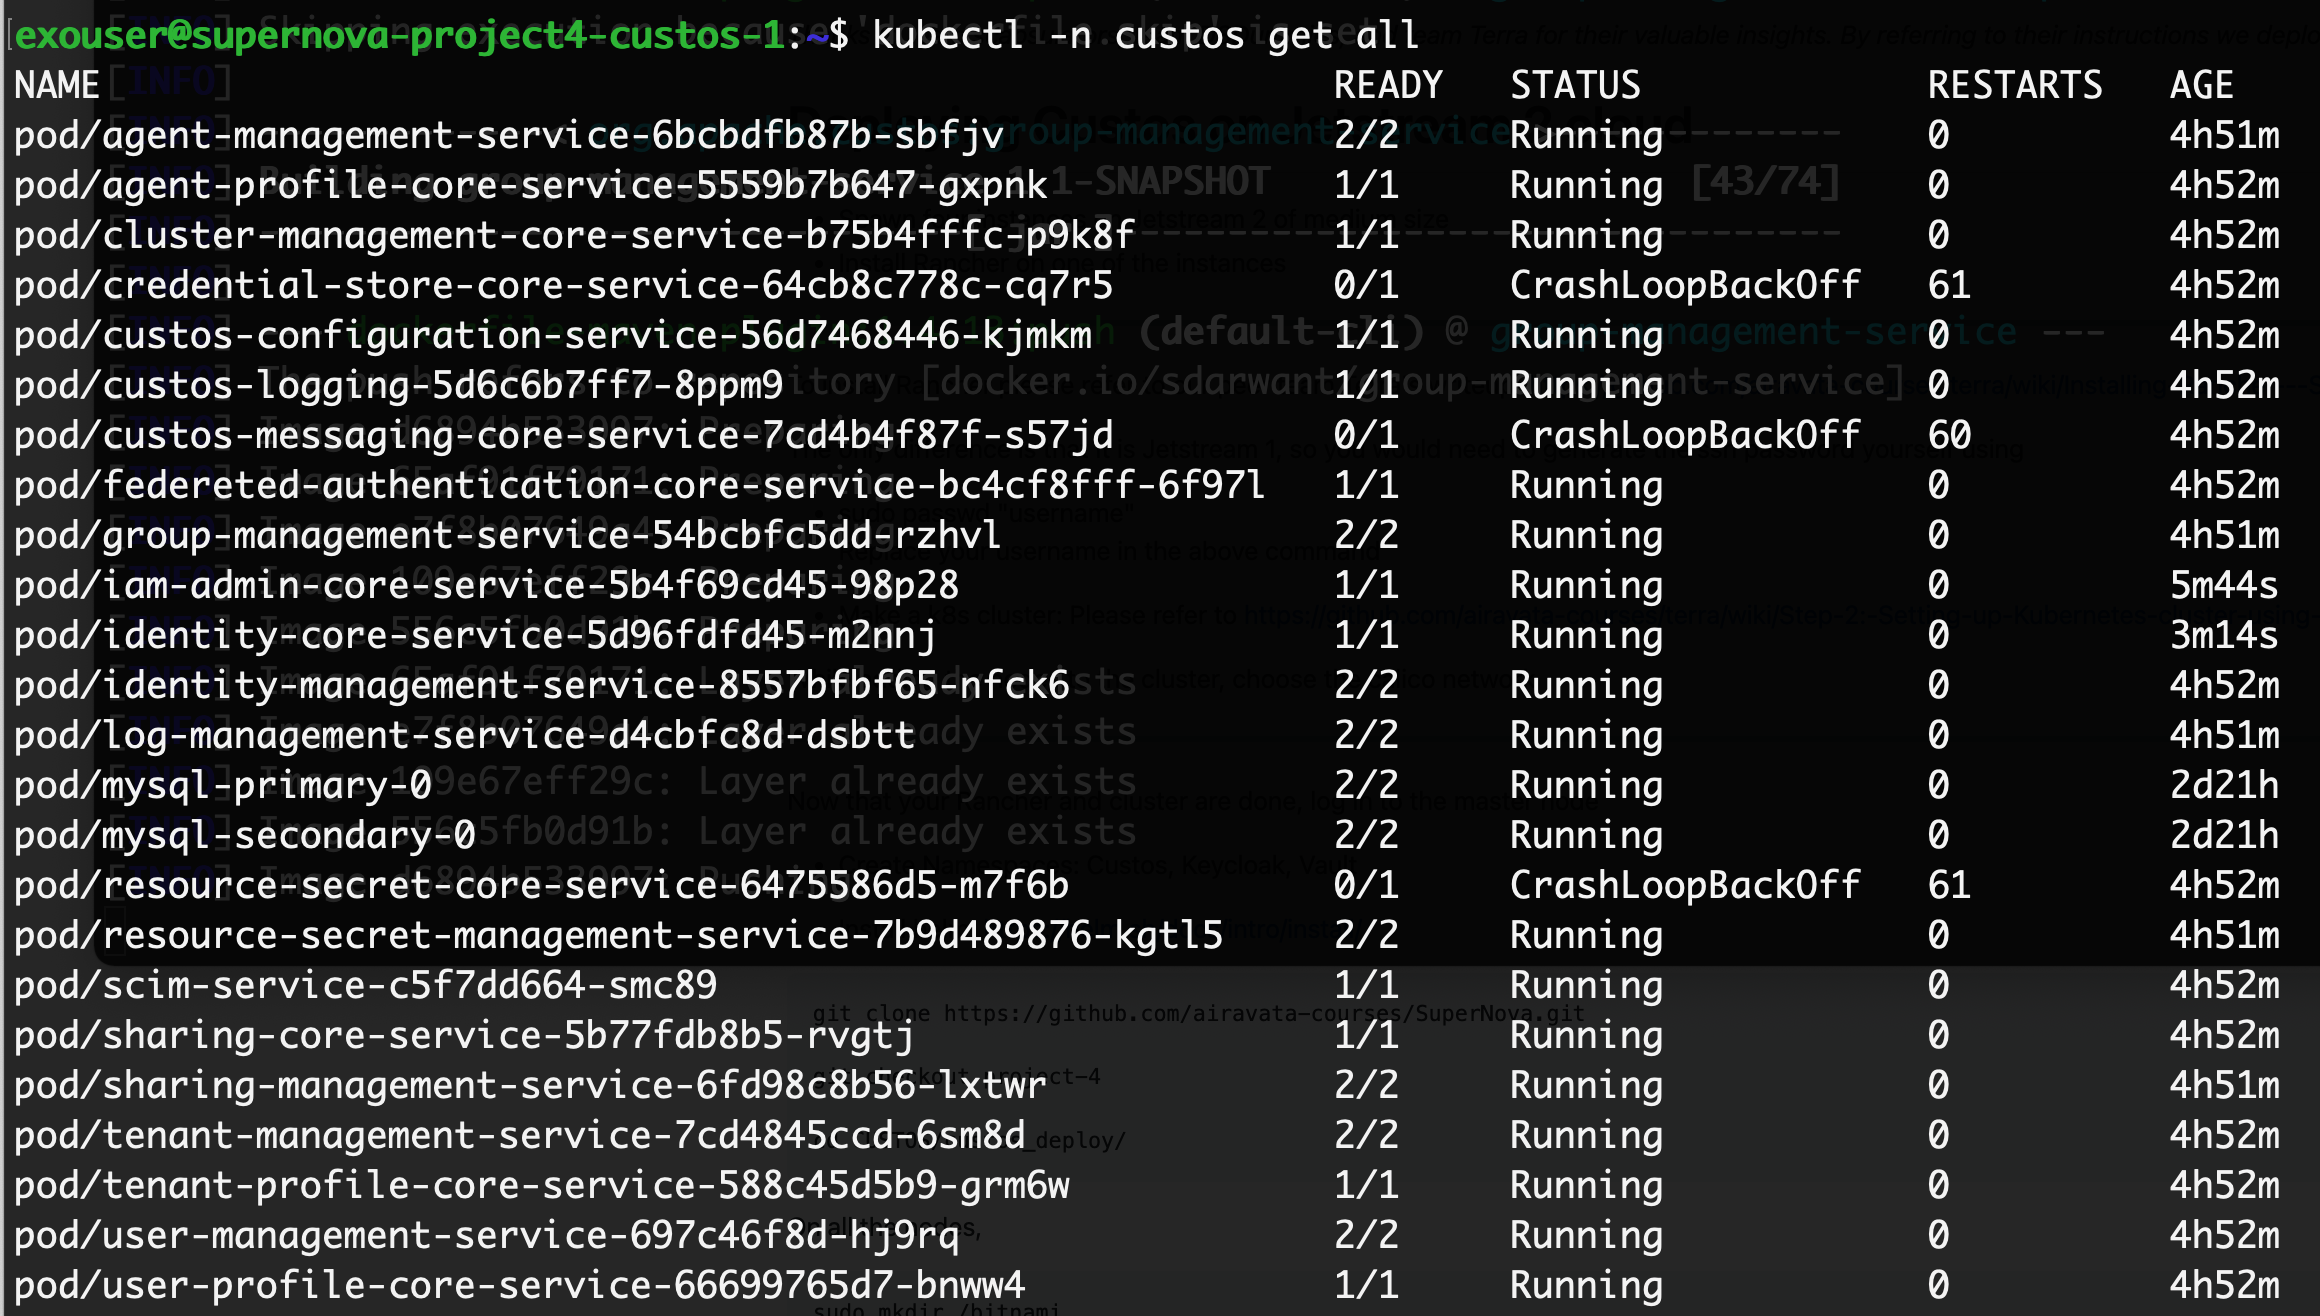
Custos deployed with 2 staging and rest dev pods:
Enable new engines named "secret" select v1 and "resourcesecret" also with v1. Post Request to register tenant https://{hostname}:30079/tenant-management/v1.0.0/oauth2/tenant
{
    "client_name":"supernova",
    "requester_email":"[email protected]",
    "admin_username":"supernovaadmin",
    "admin_first_name":"Sanket",
    "admin_last_name":"Darwante",
    "admin_email":"[email protected]",
    "contacts":["[email protected]","[email protected]"],
    "redirect_uris":["http://localhost:8080/callback*",
    "https://{host_name}/callback*"],
    "scope":"openid profile email org.cilogon.userinfo",
    "domain":"host_name",
    "admin_password":"supernova@007",
    "client_uri":"host_name",
    "logo_uri":"host_name",
    "application_type":"web",
    "comment":"Custos super tenant for production"
}
Open secret in vault, edit 100000, and change supertenant to "true".
Set supertenant to active.
POST https://{host_name}:30079/tenant-management/v1.0.0/status
{
"client_id":"{client id you got in response to last POST request}",
"status":"ACTIVE",
"super_tenant":true,
"updatedBy":"{admin_username}"
}
It should activate the tenant and the output should be:
{
    "tenant_id": "10000000",
    "status": "ACTIVE"
}