- HTML is a markup language that tells web browsers how to structure the web pages you visit. It can be as complicated or as simple as the web developer wants it to be. HTML consists of a series of elements, which you use to enclose, wrap, or mark up different parts of content to make it appear or act in a certain way. The enclosing tags can make content into a hyperlink to connect to another page, italicize words, and so on. For example, consider the following line of text:
My cat is very cute
- If we wanted the text to stand by itself, we could specify that it is a paragraph by enclosing it in a paragraph(< p >) element:
<p> My cat is very cute </p>
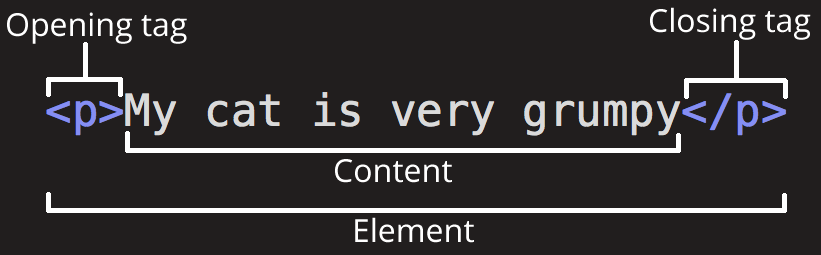
- The opening tag : This consists of the name of the element (in this example, p for paragraph), wrapped in opening and closing angle brackets. This opening tag marks where the element begins or starts to take effect. In this example, it precedes the start of the paragraph text.
- The content : This is the content of the element. In this example, it is the paragraph text.
- The closing tag : This is the same as the opening tag, except that it includes a forward slash before the element name. This marks where the element ends. Failing to include a closing tag is a common beginner error that can produce peculiar results.
- Elements can be placed within other elements. This is called nesting. If we wanted to state that our cat is very grumpy, we could wrap the word very in a < strong > element, which means that the word is to have strong(er) text formatting:
<p> My cat is <strong> very </strong> grumpy. </p>
There is a right and wrong way to do nesting. In the example above, we opened the p element first, then opened the strong element. For proper nesting, we should close the strong element first, before closing the p.
- The following is an example of the wrong way to do nesting:
<p> My cat is <strong> very grumpy. </p> </strong>
- Void elements is the elements has no closing tag , this element like image (< img/ >) tag where you embeds an image file. For example :
<img
src="https://raw.githubusercontent.com/mdn/beginner-html-site/gh-pages/images/firefox-icon.png"
alt="Firefox icon"/>
- and the output should be like this :
![]()
- Element can also have attributes

Attributes contain extra information about the element that won't appear in the content. In this example, the class attribute is an identifying name used to target the element with style information.
- A space between it and the element name. (For an element with more than one attribute, the attributes should be separated by spaces too.)
- The attribute name, followed by an equal sign.
- An attribute value, wrapped with opening and closing quote marks.
- The head of an HTML document is the part that is not displayed in the web browser when the page is loaded. It contains information such as the page < title >, links to CSS (if you choose to style your HTML content with CSS), links to custom favicons, and other metadata (data about the HTML, such as the author, and important keywords that describe the document). Web browsers use information contained in the head to render the HTML document correctly. In this article we'll cover all of the above and more, in order to give you a good basis for working with markup.
<!DOCTYPE html>
<html lang="en-US">
  <head>
    <meta charset="utf-8" />
    <title>My test page</title>
    <link rel="stylesheet" href="style.css">
  </head>
  <body>
    <p>This is my page</p>
  </body>
</html>
- In larger pages however, the head can get quite large. Try going to some of your favorite websites and use the developer tools to check out their head contents. Our aim here is not to show you how to use everything that can possibly be put in the head, but rather to teach you how to use the major elements that you'll want to include in the head, and give you some familiarity. Let's get started.
- Comment is helpful to locate something in your code or to comment the functionality of the function or commenting on what todo next, For example:
<!--
  This is a comment
-->

<!--
  TODO : Wake Up Earlier Every Morning
-->

<!--
  This function is to add two numbers
-->
- Metadata is data that describes data, and HTML has an "official" way of adding metadata to a document — the < meta > element. Of course, the other stuff we are talking about in this article could also be thought of as metadata too. There are a lot of different types of < meta > elements that can be included in your page's < head >, but we won't try to explain them all at this stage, as it would just get too confusing. Instead, we'll explain a few things that you might commonly see, just to give you an idea.
- This element specifies the document's character encoding — the character set that the document is permitted to use. utf-8 is a universal character set that includes pretty much any character from any human language. This means that your web page will be able to handle displaying any language; it's therefore a good idea to set this on every web page you create!For example :
<meta charset="utf-8" />
- name specifies the type of meta element it is; what type of information it contains.
- content specifies the actual meta content.
Two such meta elements that are useful to include on your page define the author of the page, and provide a concise description of the page. Let's look at an example:
<meta name="author" content="Chris Mills" />
<meta
  name="description"
  content="The MDN Web Docs Learning Area aims to provide complete beginners to the Web with all they need to know to get started with developing websites and applications."
/>
- Specifying an author is beneficial in many ways: it is useful to be able to understand who wrote the page, if you have any questions about the content and you would like to contact them. Some content management systems have facilities to automatically extract page author information and make it available for such purposes.
- To further enrich your site design, you can add references to custom icons in your metadata, and these will be displayed in certain contexts. The most commonly used of these is the favicon (short for "favorites icon", referring to its use in the "favorites" or "bookmarks" lists in browsers).
- Saving it in the same directory as the site's index page, saved in .ico format (most also support favicons in more common formats like .gif or .png)
- Adding the following line into your HTML's block to reference it:
<link rel="icon" href="favicon.ico" type="image/x-icon" />
- To apply css to your html you can use < link /> tag element , for example :
<link rel="stylesheet" href="my-css-file.css" />
- The < link > element should always go inside the head of your document. This takes two attributes, rel="stylesheet", which indicates that it is the document's stylesheet, and href, which contains the path to the stylesheet file:
- To apply Javascript in you html you can use < script ></ script > tag element , for example :
<script src="my-js-file.js" defer></script>
- The < script > element should also go into the head, and should include a src attribute containing the path to the JavaScript you want to load, and defer, which basically instructs the browser to load the JavaScript after the page has finished parsing the HTML. This is useful as it makes sure that the HTML is all loaded before the JavaScript runs, so that you don't get errors resulting from JavaScript trying to access an HTML element that doesn't exist on the page yet. There are actually a number of ways to handle loading JavaScript on your page
- Most structured text consists of headings and paragraphs, whether you are reading a story, a newspaper, a college textbook, a magazine, etc.
Structured content makes the reading experience easier and more enjoyable.
In HTML, each paragraph has to be wrapped in a < p > element, like so:
<p>I am a paragraph, oh yes I am.</p>
- Each heading has to be wrapped in a heading element:
<h1>I am the title of the story.</h1>
- There are six heading elements: h1, h2, h3, h4, h5, and h6. Each element represents a different level of content in the document; < h1 > represents the main heading, < h2 > represents subheadings, < h3 > represents sub-subheadings, and so on.
- For example, in this story, the < h1 > element represents the title of the story, the < h2 > elements represent the title of each chapter, and the < h3 > elements represent sub-sections of each chapter:
<h1>The Crushing Bore</h1>

<p>By Chris Mills</p>

<h2>Chapter 1: The dark night</h2>

<p>
  It was a dark night. Somewhere, an owl hooted. The rain lashed down on the…
</p>

<h2>Chapter 2: The eternal silence</h2>

<p>Our protagonist could not so much as a whisper out of the shadowy figure…</p>

<h3>The specter speaks</h3>

<p>
  Several more hours had passed, when all of a sudden the specter sat bolt
  upright and exclaimed, "Please have mercy on my soul!"
</p>
- It's really up to you what the elements involved represent, as long as the hierarchy makes sense. You just need to bear in mind a few best practices as you create such structures:
-Preferably, you should use a single < h1 > per page—this is the top level heading, and all others sit below this in the hierarchy.
- Make sure you use the headings in the correct order in the hierarchy. Don't use < h3 > elements to represent subheadings, followed by
< h2 > elements to represent sub-subheadings—that doesn't make sense and will lead to weird results.
- Of the six heading levels available, you should aim to use no more than three per page, unless you feel it is necessary. Documents with many levels (for example, a deep heading hierarchy) become unwieldy and difficult to navigate. On such occasions, it is advisable to spread the content over multiple pages if possible.
- Semantics are relied on everywhere around us—we rely on previous experience to tell us what the function of an everyday object is; when we see something, we know what its function will be.
In a similar way, we need to make sure we are using the correct elements, giving our content the correct meaning, function, or appearance. In this context, the h1 element is also a semantic element, which gives the text it wraps around the role (or meaning) of "a top level heading on your page."
<h1>This is a top level heading</h1>
- By default, the browser will give it a large font size to make it look like a heading (although you could style it to look like anything you wanted using CSS). More importantly, its semantic value will be used in multiple ways, for example by search engines and screen readers (as mentioned above).
On the other hand, you could make any element look like a top level heading. Consider the following:
<span style="font-size: 32px; margin: 21px 0; display: block;">
  Is this a top level heading?
</span>
This is a element. It has no semantics. You use it to wrap content when you want to apply CSS to it (or do something to it with JavaScript) without giving it any extra meaning. (You'll find out more about these later on in the course.) We've applied some CSS to it to make it look like a top level heading, but since it has no semantic value, it will not get any of the extra benefits described above. It is a good idea to use the relevant HTML element for the job.
Now let's turn our attention to lists. Lists are everywhere in life—from your shopping list to the list of directions you subconsciously follow to get to your house every day, to the lists of instructions you are following in these tutorials! Lists are everywhere on the web, too, and we've got three different types to worry about.
- Unordered lists are used to mark up lists of items for which the order of the items doesn't matter. Let's take a shopping list as an example:
milk
eggs
bread
hummus
- Every unordered list starts off with a < ul > element—this wraps around all the list items:
<ul>
  milk
  eggs
  bread
  hummus
</ul>
- The last step is to wrap each list item in a
- (list item) element:
<ul>
  <li>milk</li>
  <li>eggs</li>
  <li>bread</li>
  <li>hummus</li>
</ul>
- Ordered lists are lists in which the order of the items does matter. Let's take a set of directions as an example:
Drive to the end of the road
Turn right
Go straight across the first two roundabouts
Turn left at the third roundabout
The school is on your right, 300 meters up the road
- The markup structure is the same as for unordered lists, except that you have to wrap the list items in an < ol > element, rather than < ul >:
<ol>
  <li>Drive to the end of the road</li>
  <li>Turn right</li>
  <li>Go straight across the first two roundabouts</li>
  <li>Turn left at the third roundabout</li>
  <li>The school is on your right, 300 meters up the road</li>
</ol>
- It is perfectly OK to nest one list inside another one. You might want to have some sub-bullets sitting below a top-level bullet. Let's take the second list from our recipe example:
<ol>
  <li>Remove the skin from the garlic, and chop coarsely.</li>
  <li>Remove all the seeds and stalk from the pepper, and chop coarsely.</li>
  <li>Add all the ingredients into a food processor.</li>
  <li>Process all the ingredients into a paste.</li>
  <li>If you want a coarse "chunky" hummus, process it for a short time.</li>
  <li>If you want a smooth hummus, process it for a longer time.</li>
</ol>
- Since the last two bullets are very closely related to the one before them (they read like sub-instructions or choices that fit below that bullet), it might make sense to nest them inside their own unordered list and put that list inside the current fourth bullet. This would look like so:
<ol>
  <li>Remove the skin from the garlic, and chop coarsely.</li>
  <li>Remove all the seeds and stalk from the pepper, and chop coarsely.</li>
  <li>Add all the ingredients into a food processor.</li>
  <li>
    Process all the ingredients into a paste.
    <ul>
      <li>
        If you want a coarse "chunky" hummus, process it for a short time.
      </li>
      <li>If you want a smooth hummus, process it for a longer time.</li>
    </ul>
  </li>
</ol>
- We use emphasis < em > when it something important or to be noticed and < strong > so it can clearly says that it's important to remember that word or text, for example :
- When we want to add emphasis in spoken language, we stress certain words, subtly altering the meaning of what we are saying. For example, the following two sentences have different meanings.
I am glad you weren't late.
I am glad you weren't late. - In HTML we use the < em > (emphasis) element to mark up such instances. As well as making the document more interesting to read, these are recognized by screen readers, which can be configured to speak them in a different tone of voice. Browsers style this as italic by default, but you shouldn't use this tag purely to get italic styling. To do that, you'd use a < span > element and some CSS, or perhaps an < i > element (see below).
<p>I am <em>glad</em> you weren't <em>late</em>.</p>
- To emphasize important words, we tend to stress them in spoken language and bold them in written language. For example:
- This liquid is highly toxic.
- I am counting on you. Do not be late! - In HTML we use the < strong > (strong importance) element to mark up such instances. As well as making the document more useful, again these are recognized by screen readers, which can be configured to speak them in a different tone of voice. Browsers style this as bold text by default, but you shouldn't use this tag purely to get bold styling. To do that, you'd use a < span > element and some CSS, or perhaps a < b > element (see below).
<p>This liquid is <strong>highly toxic</strong>.</p>

<p>I am counting on you. <strong>Do not</strong> be late!</p>
- You can nest strong and emphasis inside one another if desired:
<p>This liquid is <strong>highly toxic</strong> — if you drink it, <strong>you may <em>die</em></strong>.</p>
The elements we've discussed so far have clearcut associated semantics. The situation with < b >, < i >, and < u > is somewhat more complicated. They came about so people could write bold, italics, or underlined text in an era when CSS was still supported poorly or not at all. Elements like this, which only affect presentation and not semantics, are known as presentational elements and should no longer be used because, as we've seen before, semantics is so important to accessibility, SEO, etc.
- Always keep an accessibility mindset. The concept of italics isn't very helpful to people using screen readers, or to people using a writing system other than the Latin alphabet.
- < i > is used to convey a meaning traditionally conveyed by italic: foreign words, taxonomic designation, technical terms, a thought…
- < b > is used to convey a meaning traditionally conveyed by bold: keywords, product names, lead sentence…
- < u > is used to convey a meaning traditionally conveyed by underline: proper name, misspelling…
<!-- scientific names -->
<p>
  The Ruby-throated Hummingbird (<i>Archilochus colubris</i>) is the most common
  hummingbird in Eastern North America.
</p>

<!-- foreign words -->
<p>
  The menu was a sea of exotic words like <i lang="uk-latn">vatrushka</i>,
  <i lang="id">nasi goreng</i> and <i lang="fr">soupe à l'oignon</i>.
</p>

<!-- a known misspelling -->
<p>Someday I'll learn how to <u class="spelling-error">spel</u> better.</p>

<!-- term being defined when used in a definition -->
<dl>
  <dt>Semantic HTML</dt>
  <dd>
    Use the elements based on their <b>semantic</b> meaning, not their
    appearance.
  </dd>
</dl>
Hyperlinks are really important — they are what makes the Web a web. This article shows the syntax required to make a link, and discusses link best practices.
- What is a hyperlink?
Hyperlinks are one of the most exciting innovations the Web has to offer. They've been a feature of the Web since the beginning, and are what makes the Web a web. Hyperlinks allow us to link documents to other documents or resources, link to specific parts of documents, or make apps available at a web address.
- A basic link is created by wrapping the text or other content inside an < a > element and using the href attribute, also known as a Hypertext Reference, or target, that contains the web address.
<p>
  I'm creating a link to
  <a href="https://www.mozilla.org/en-US/">the Mozilla homepage</a>.
</p>
- This gives us the following result:
I'm creating a link to the Mozilla homepage.