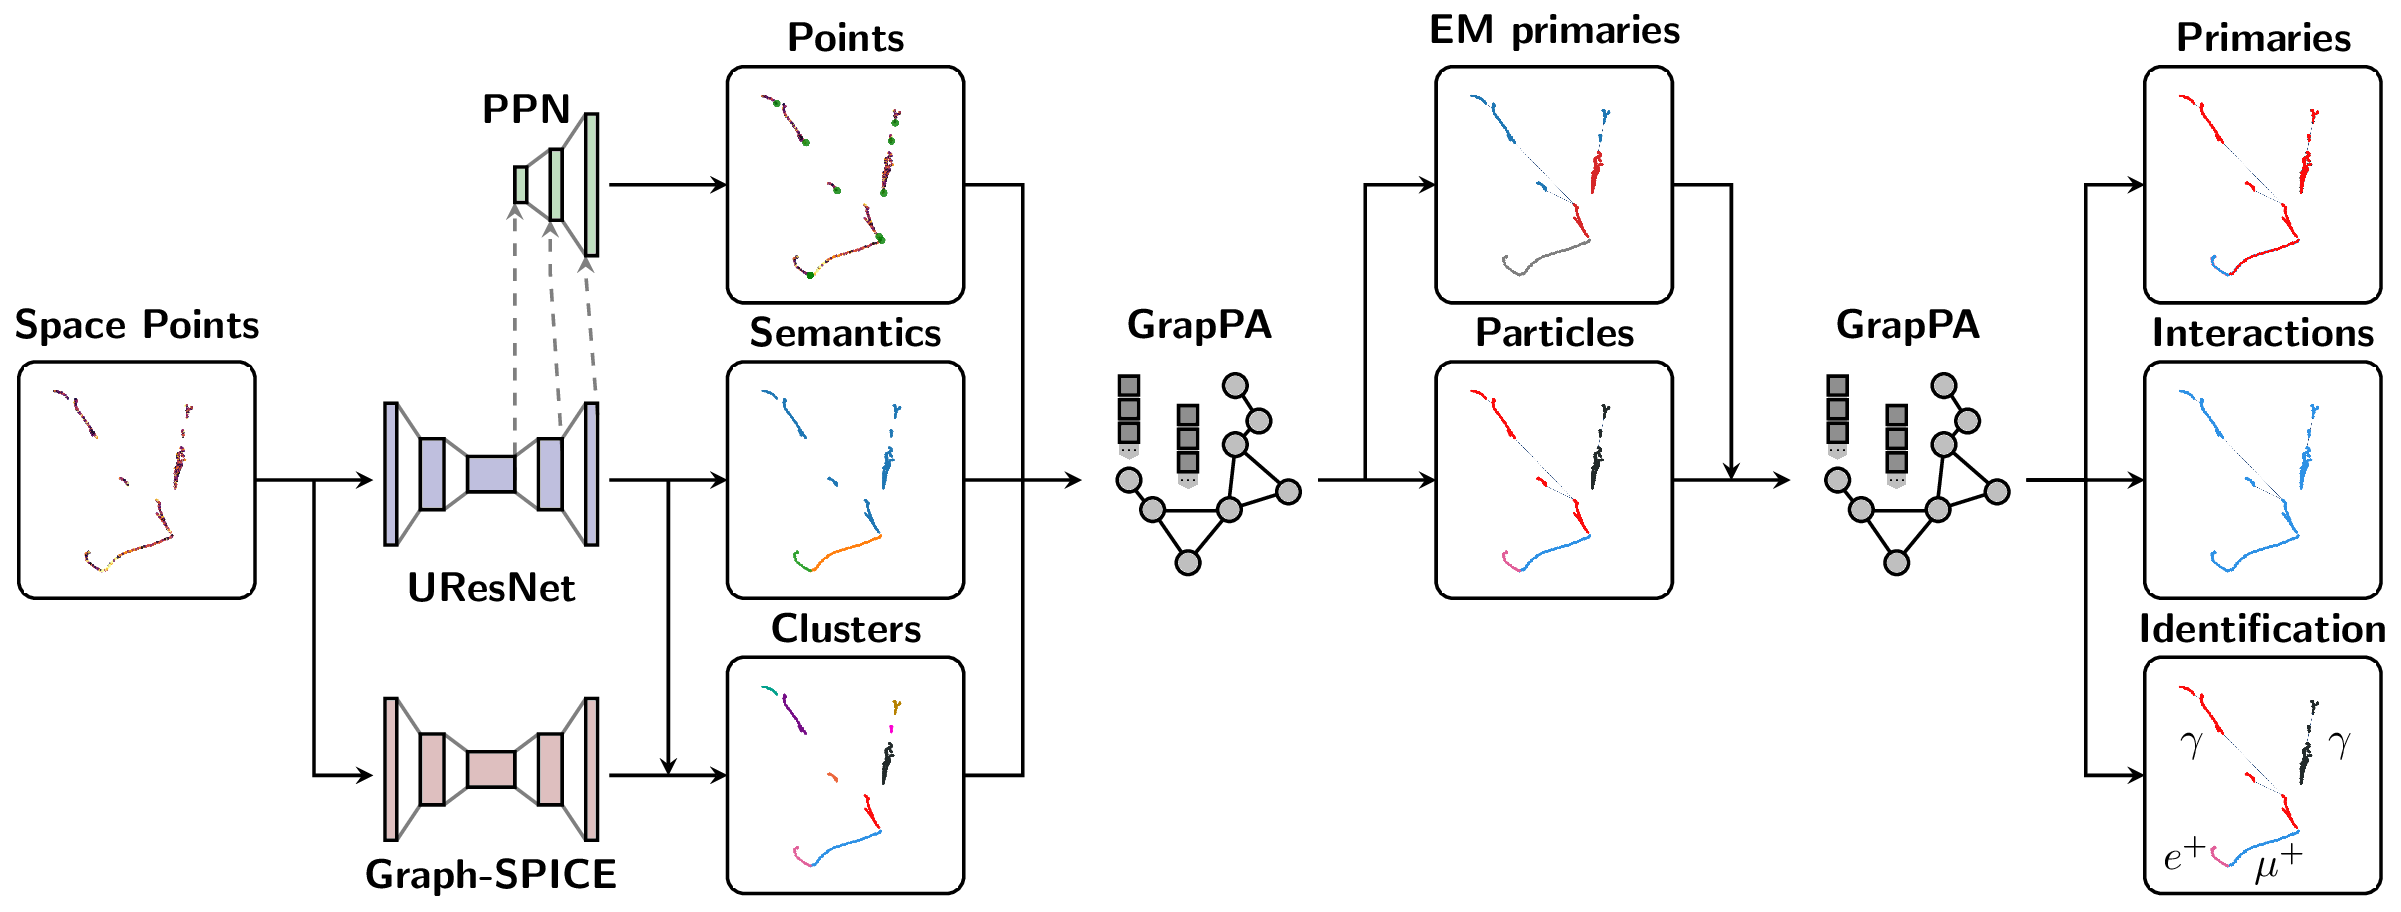
The Scalable Particle Imaging with Neural Embeddings (SPINE) package leverages state-of-the-art Machine Learning (ML) algorithms -- in particular Deep Neural Networks (DNNs) -- to reconstruct particle imaging detector data. This package was primarily developed for Liquid Argon Time-Projection Chamber (LArTPC) data and relies on Convolutional Neural Networks (CNNs) for pixel-level feature extraction and Graph Neural Networks (GNNs) for superstructure formation. The schematic below breaks down the full end-to-end reconstruction flow.
SPINE is now available on PyPI with flexible installation options to suit different needs:
For data analysis and visualization without machine learning:
pip install spine-ml[all]1. Core Package (minimal dependencies)
# Essential dependencies: numpy, scipy, pandas, PyYAML, h5py, numba
pip install spine-ml
2. With Visualization Tools
# Adds plotly, matplotlib, seaborn for data visualization
pip install spine-ml[viz]
3. Development Environment
# Adds testing, formatting, and documentation tools
pip install spine-ml[dev]
4. Everything (except PyTorch)
# All optional dependencies (visualization + development tools)
pip install spine-ml[all]The easiest way to get a working PyTorch environment with LArCV support:
# Pull the SPINE-compatible container with complete PyTorch ecosystem + LArCV
singularity pull spine-ml.sif docker://deeplearnphysics/larcv2:ub2204-cu121-torch251-larndsim

# Install SPINE in the container
singularity exec spine-ml.sif pip install spine-ml[all]

# Run your analysis
singularity exec spine-ml.sif spine --config your_config.cfg --source data.h5
This container includes: PyTorch 2.5.1, CUDA 12.1, torch-geometric, torch-scatter, torch-cluster, MinkowskiEngine, and LArCV2.
# Step 1: Install PyTorch with CUDA
pip install torch --index-url https://download.pytorch.org/whl/cu118

# Step 2: Install ecosystem packages (critical order)
pip install --no-build-isolation torch-scatter torch-cluster torch-geometric MinkowskiEngine

# Step 3: Install SPINE
pip install spine-ml[all]
� Why separate? The PyTorch ecosystem (torch, torch-geometric, torch-scatter, torch-cluster, MinkowskiEngine) forms an interdependent group requiring exact version compatibility and complex compilation. Installing them together ensures compatibility.
# LArCV2 is pre-installed in the DeepLearnPhysics container
singularity pull spine-ml.sif docker://deeplearnphysics/larcv2:ub2204-cu121-torch251-larndsim# Clone and build the latest LArCV2
git clone https://github.com/DeepLearnPhysics/larcv2.git
cd larcv2
# Follow build instructions in the repositoryNote: Avoid conda-forge larcv packages as they may be outdated. Use the container or build from the official source.
For developers who want to work with the source code:
git clone https://github.com/DeepLearnPhysics/spine.git
cd spine
pip install -e .[dev]For rapid development and testing without reinstalling the package:
# Clone the repository
git clone https://github.com/DeepLearnPhysics/spine.git
cd spine

# Install only the dependencies (not the package itself)
# Or alternatively simple run the commands inside the above container
pip install numpy scipy pandas pyyaml h5py numba psutil

# Run directly from source
python src/spine/bin/run.py --config config/train_uresnet.cfg --source /path/to/data.h5

# Or make it executable and run directly
chmod +x src/spine/bin/run.py
./src/spine/bin/run.py --config your_config.cfg --source data.h5
💡 Development Tip: This approach lets you test code changes immediately without reinstalling. Perfect for rapid iteration during development.
To build and test packages locally:
# Build the package
./build_packages.sh

# Install locally built package
pip install dist/spine_ml-*.whl[all]Option 1: After installation, use the spine command:
# Run training/inference/analysis
spine --config config/train_uresnet.cfg --source /path/to/data.h5
Option 2: Run directly from source (development):
# From the spine repository directory
python src/spine/bin/run.py --config config/train_uresnet.cfg --source /path/to/data.h5Basic example:
# Necessary imports
import yaml
from spine.driver import Driver

# Load configuration file
cfg_path = 'config/train_uresnet.cfg'  # or your config file
with open(cfg_path, 'r') as f:
    cfg = yaml.safe_load(f)

# Initialize driver class
driver = Driver(cfg)

# Execute model following the configuration regimen
driver.run()- Documentation is available at https://spine-ml.readthedocs.io/.
- Tutorials and examples can be found in the documentation.
Example configurations are available in the config folder:
| Configuration name | Model |
|---|---|
train_uresnet.cfg |
UResNet alone |
train_uresnet_ppn.cfg |
UResNet + PPN |
train_graph_spice.cfg |
GraphSpice |
train_grappa_shower.cfg |
GrapPA for shower fragments clustering |
train_grappa_track.cfg |
GrapPA for track fragments clustering |
train_grappa_inter.cfg |
GrapPA for interaction clustering |
To switch from training to inference mode, set trainval.train: False in your configuration file.
Key configuration parameters you may want to modify:
batch_size- batch size for training/inferenceweight_prefix- directory to save model checkpointslog_dir- directory to save training logsiterations- number of training iterationsmodel_path- path to checkpoint to load (optional)train- boolean flag for training vs inference modegpus- GPU IDs to use (leave empty '' for CPU)
For more information on storing analysis outputs and running custom analysis scripts, see the documentation on outputs (formatters) and analysis (scripts) configurations.
Basic usage with the spine command:
# Run training/inference directly
spine --config config/train_uresnet.cfg --source /path/to/data.h5

# Or run in background with logging
nohup spine --config config/train_uresnet.cfg --source /path/to/data.h5 > log_uresnet.txt 2>&1 &
You can load a configuration file into a Python dictionary using:
import yaml
# Load configuration file
with open('config/train_uresnet.cfg', 'r') as f:
cfg = yaml.safe_load(f)A quick example of how to read a training log, and plot something
import pandas as pd
import matplotlib.pyplot as plt
fname = 'path/to/log.csv'
df = pd.read_csv(fname)

# plot moving average of accuracy over 10 iterations
df.accuracy.rolling(10, min_periods=1).mean().plot()
plt.ylabel("accuracy")
plt.xlabel("iteration")
plt.title("moving average of accuracy")
plt.show()

# list all column names
print(df.columns.values)Documentation for analysis tools and output formatting is available in the main documentation at https://spine-ml.readthedocs.io/.
bincontains utility scripts for data processingconfighas example configuration filesdocscontains documentation source filessrc/spinecontains the main package codetestcontains unit tests using pytest
Please consult the documentation for detailed information about each component.
Before you start contributing to the code, please see the contribution guidelines.
The SPINE framework is designed to be extensible. To add a new model:
-
Data Loading: Parsers exist for various sparse tensor and particle outputs in
spine.io.core.parse. If you need fundamentally different data formats, you may need to add new parsers or collation functions. -
Model Implementation: Add your model to the
spine.modelpackage. Include your model in the factory dictionary inspine.model.factoriesso it can be found by the configuration system. -
Configuration: Create a configuration file in the
config/folder that specifies your model architecture and training parameters.
Once these steps are complete, you should be able to train your model using the standard SPINE workflow.


