This guide walks you through how to install Cannabis Data for development. Any and all contributions are welcome, no matter how small.
In brief, installation entails:
- Cloning the repository.
- Setting your Firebase account credentials.
- Installing project dependencies and development tools.
The best place to begin is to clone the repository and get a lay of the architecture. You can open a command prompt, navigate to where you wish for the source code to live, and clone the repository.
git clone https://github.com/cannabisdata/cannabisdata.gitCreating your credentials is often the most time consuming, yet important, part of installation. Once you have appropriately set all of your credentials, then you will be off to the races, safely and securely. Currently, Cannabis Data expects a Firebase account and a Firebase project, so creating a Firebase project is often a good place to begin.
2.1. First, create an .env file at the project's root.
2.2. Next, create a Django secret key and save it in your .env file as follows.
# tools/quickstart.py
from django.utils.crypto import get_random_string

# Generate a secret key for your project.
chars = 'abcdefghijklmnopqrstuvwxyz0123456789!@#$%^&*(-_=+)'
generated_secret_key = get_random_string(50, chars)
print(generated_secret_key)
# .env
SECRET_KEY=xyz2.3 Next, add a Firebase web app. We recommend using the same namespace you chose for your project, for example cannabisdata, and setting up Firebase Hosting with your app. We recommend choosing a project name that is in kebab-case so that you can safely use the project name for many namespaces throughout the project. Once you have created a web app, navigate to your Firebase project settings, find your Firebase app Config, and set your Firebase configuration in your .env file.
# .env
FIREBASE_PROJECT_ID=cannlytics-cannabis-data
FIREBASE_API_KEY=xyz
FIREBASE_APP_ID=123
FIREBASE_AUTH_DOMAIN=cannlytics-cannabis-data.firebaseapp.com
FIREBASE_STORAGE_BUCKET=cannlytics-cannabis-data.appspot.com
FIREBASE_MESSAGING_SENDER_ID=123
FIREBASE_DATABASE_URL=https://cannlytics-cannabis-data.firebaseio.com
FIREBASE_HOSTING_URL=https://cannlytics-cannabis-data.web.app/
2.5. Finally, to facilitate development and administration of your app and Firebase account, you can create and download a Firebase service account ("Project Settings" -> "Service Accounts" -> "Generate new private key") and save the path to your key as a GOOGLE_APPLICATION_CREDENTIALS environment variable. These credentials will only be used for development and administrative functionality. For your security, this configuration file needs to be kept in a safe place and should be treated as a password to your account.
# .env
GOOGLE_APPLICATION_CREDENTIALS=path/to/your/service/account.json
If you are leveraging Secret Manager, which is the default, then you will need to grant your service key Secret Manager Admin permissions in Cloud IAM Admin.
2.6. Finish by creating a .firebasesrc in the root directory with your Firebase Hosting references. For example:
{
  "projects": {
    "default": "cannlytics-cannabis-data"
  },
  "targets": {
    "cannlytics-cannabis-data": {
      "hosting": {
        "dev": [
          "cannlytics-cannabis-data-dev"
        ],
        "production": [
          "cannlytics-cannabis-data"
        ]
      }
    }
  }
}Cannabis Data is built and tested with Python 3.9 and above. We recommend using Anaconda if you are developing. You can then create a virtual environment to test, develop, and use the dashboard in isolation and in a reproducible manner. After installing Anaconda, you can open a terminal in the console directory and run the following commands to create a ready-to-go environment.
conda create --name cannabisdata python=3.9
conda activate cannabisdata
pip install -r requirements.txt
python manage.py migrate
npm install
Compile JavaScript resources.
cd dashboard
npx webpackCannabis Data is built with Python and leverages the Django framework. Cannabis Data utilizes Firebase for user authentication with Firebase Authentication, a Firestore NoSQL database for real-time data management, Firebase Storage for file storage, and is hosted with Firebase Hosting. Cannabis Data uses a number of Google Cloud backend services, including:
- Cloud Build to containerize the app.
- Cloud Registry to upload the app to storage.
- Cloud Run to run the app as a stateless container.
- Cloud Storage for additional file storage.
- Cloud Secret Manager for storing configurations and keeping secrets secret.
Cannabis Data generally follows a model-template-view (MTV) architectural pattern, where:
- The model is Django,
cannabisdata, and all engine components, such as JavaScript and CSS, that contain the logic of the application, which is provided to the views. - The templates are Django HTML files that describe the display and how data are presented.
- The views are Python functions that control the model's logic, specify and provide data to templates, and manage user requests.
Cannabis Data favors a domain-style code structure for apps and material that will be edited frequently, separating Python views, HTML templates, and Javascript/CSS assets, and a ducks-style code structure for concepts within the apps, grouping dependencies required for a specific feature. 🦆 Ducks can inherit properties if needed, but are encouraged to be individualized and as self-contained as possible. The architecture of the Cannabis Data app is as follows.
├── .admin
│   └── tokens
│       └── your-firebase-service-account.json
├── .firebase
│   ├── firestore.indexes # Available database queries.
│   ├── firestore.rules # Database access control and data validation.
|   └── storage.rules # File storage access control and validation.
├── api
│   ├── {endpoint}
│   |   └── {endpoint}.py # Implementation of specific API endpoints.
│   ├── api.py # Implementation of general API endpoints.
|   └── urls.py # Defined API endpoints.
├── dashboard
│   ├── assets
│   |   ├── css # StyleSheets.
│   |   └── js # JavaScript to be bundled into a `cannabisdata` module.
│   ├── core # Required Django configuration.
│   ├── static/dashboard # Static files, including images and Webpack bundles.
│   ├── templates/dashboard # User interface templates.
│   ├── templatetags # Custom template helpers.
│   ├── views # Controls templates, context, user requests, and application logic.
│   ├── settings.py # Django configuration.
│   ├── state.py # Static text for certain pages and sections.
│   └── urls.py # Routes and navigation.
├── node_modules
├── public
|   └── static # Files hosted with Firebase hosting. Populated programmatically.
├── tests # Tests of all features and functionality.
├── tools # Development tools.
├── .env # Your secrets.
├── .firebasesrc # Firebase hosting sources.
├── db.sqlite3 # Unused SQL database.
├── Dockerfile # Docker container configuration.
├── firebase.json # Firebase configuration file.
├── LICENSE
├── manage.py # Django development utility script.
├── package.json # Node.js dependencies and scripts.
├── README.md
├── requirements.txt # Python requirements.
└── webpack.config.js # JavaScript and CSS Webpack bundle configuration.Development can happen in many avenues. Frequent, small scope pull requests are encouraged. Any contribution, even if it needs future polishing, helps build the project and advance the field of cannabis data. In general;
- Create a fork of the repository and set up your development environment.
- Work on a solution for your most-pressing problem. Be creative.
- Create a pull request for your changes to be reviewed and merged into the project upon approval or for you to receive feedback on how your changes can be approved.
The simplest way to run the app is to open a command line from the project's root directory and run:
python manage.py runserverYou can leverage django-livereload-server for hot-reloading while you develop, simply with:
npm run dashboard:startIf you encounter problems with livereload, then try
pip uninstall django-livereload-server livereloadfollowed bypip install django-livereload-server.
Below is a diagram that depicts how Cannabis Data leverages Firebase Authentication to authorize user requests.
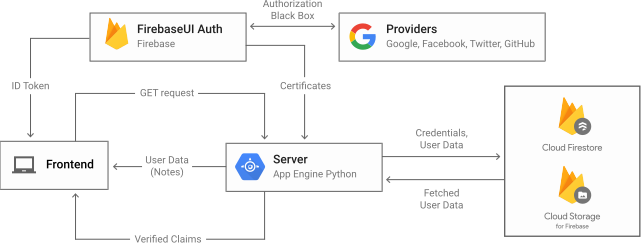
Original image: How to authenticate users on Google App Engine using Firebase
Hot-reloading is an important tool of development. You can use django-livereload-server, which uses both python-livereload and django-livereload, for smooth reloading. You can install django-live-reload-server with:
pip install django-livereload-serverYou can start hot-reloading by starting the livereload server:
python manage.py livereloadIn another console, you start the Django development server as usual:
python manage.py runserverYou can compile JavaScript (ES6) and SCSS, utilizing Webpack. The output JavaScript bundle is a module and is callable from the user interface with the cannabisdata namespace, handy for use in templates. You can run the build for development with:
webpack-dev-server --env production=FalseIt is an inconvenience to run multiple consoles, but a major convenience to have smooth hot-reloading. So, npm-run-all is used to run multiple servers in the same console for smooth development. When you are setup, you can run the project for development simply with:
npm run dashboard:startFirestore, a NoSQL database, is used by default. You can conceptualize every entity as a JSON object called a document. A group of documents is a collection. Every document is required to be a member of a collection. Data permissions are managed in .firebase/firestore.rules. You can deploy a new set of Firestore security rules with:
firebase deploy --only firestore:rulesFirebase Storage (a.k.a Google Cloud Storage) is used for most file storage solutions. For help with storing static files, see serving static files on App Engine. You can gather all supporting files, located in each app's static directory, into the public/static directory with:
python manage.py collectstatic --noinputFile permissions are managed in .firebase/storage.rules. You can deploy a new set of storage security rules with:
firebase deploy --only storage:rulesYou can configure where static files are served from in dashboard/settings.py, such as using Cloud Storage or AWS instead of Firebase Hosting.
Views are Python functions that describe the data to be presented. Django describes views in the following quote.
"Your view can read records from a database, or not. It can use a template system such as Django's – or a third-party Python template system – or not. It can generate a PDF file, output XML, create a ZIP file on the fly, anything you want, using whatever Python libraries you want."
Templates are Django HTML files that describe how the data is presented. Default Django templates can be found in your Anaconda/Python directory in Lib\site-packages\django\contrib\admin\templates\admin.
Bootstrap 5 is used for styling templates. Style distinguishes one site from another. You are free and encouraged to modify the style to create a site that is uniquely yours.
All text material is either stored in JSON in state.py, written in Markdown in the dashboard/assets/docs directory, or retrieved from Firebase dynamically. There are many ways that you can extend the markdown functionality with python-markdown Extensions.
You can build the application in a Docker container image with:
# build docker image
docker build -t cannabisdata .
You can register the container with:
# docker push to container registry.
docker push cannabisdata
You can run the application container locally with:
# run docker
docker run -dp 8080:8080 --env-file docker.env cannabisdata
Finally, you can quickly run the container, or multiple containers, with:
# bring up containers
docker-compose up -d --build

# bring down
docker-compose down

# logs
docker-compose logsYou can check for errors detectable by Django with:
python manage.py checkYou can run tests for a specific app with.
python manage.py test cannabisdataYou can also build the platform in a docker container for your specific purposes:
docker build . --tag gcr.io/cannabisdata/cannabisdata
gcloud auth configure-docker
docker push gcr.io/cannabisdata/cannabisdataSee the publishing documentation for complete instructions on how to publish Cannabis Data to a production-grade environment. The guide is based on the Running Django on Cloud Run guide. After setup, publishing is done with one command:
npm run dashboard:publishIf you need to change accounts or projects, then you can use:
gcloud config set account `ACCOUNT`
gcloud config set project `PROJECT ID`
The build process contains three steps:
- Containerize the app and upload it to Container Registry.
Build your container image using Cloud Build by running the following command from the directory containing the Dockerfile:
gcloud builds submit --tag gcr.io/cannabisdata/cannabisdata- Deploy the container image to Cloud Run.
gcloud beta run deploy cannabisdata --image gcr.io/cannabisdata/cannlytics --region us-central1 --allow-unauthenticated --service-account=${GCS_SA}- Direct hosting requests to the containerized app.
firebase deploy --only hosting:productionThis final step provides access to the containerized app from your Firebase Hosting URL. Your containerized app, running on Cloud Run, is now generating dynamic content for your Firebase-hosted site. Carpe diem 🎉